First Aid Beauty Facial Radiance Pads | Review – Blogmas Day #12


If you didn’t already know, I am little obsessed with skincare, and this rather unfortunate for someone who has a somewhat limited student budget. I am all for the philosophy that you should invest in skincare – and I also think this is important for any age. Looking after your skin and making it look its best is not only hugely confidence-boosting, but also makes the application of makeup that much more flawless. After quite a bit of experimentation, I am really starting to learn what my skin does and doesn’t like, and I have come to the conclusion that it just can’t get enough of acid exfoliation.


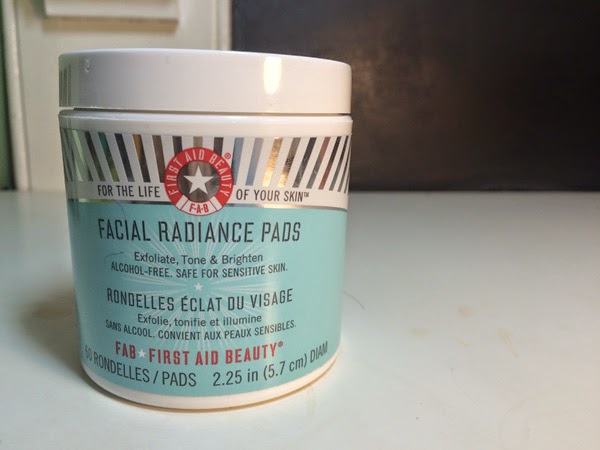
The First Aid Beauty Facial Radiance Pads are essentially thin pads soaked in a liquid exfoliant with its main acids being lactic acid and glycolic acid. Within my skincare routine (stay posted for a full updated post coming soon), the liquid exfoliant comes after cleansing the skin. I was really intrigued by these pads as it seemed like a convenient way to do this step. The pads come incredibly saturated with product, more than enough to use all over the face and the neck. The way I like to use these is to gently rub in circular motions, and I especially like to concentrate the product on any active breakouts. 

After using these for a while now, I definitely find that they help with calming and ridding of breakouts, as I find that many exfoliating toners do. I also feel that they leave my skin looking brighter and fresher, and feeling ultimately a lot smoother. They claim that these are suitable for sensitive skin (which I personally think means absolutely nothing) but if your skin isn’t used to exfoliating toners then I would probably only suggest to use these daily. I personally like to use these in the morning as, for some reason, I think its easier to grab one of these than soak my own cotton pad in another toner… I will then use a different toner at night. 

Overall I think these pads are a great way to exfoliate the skin without using those really intense and vigorous manual scrubs. If you’ve got acne-prone skin, I think you definitely need to give some sort of liquid exfoliant a go – since I’ve started using them they have done absolute wonders for my skin. Have you tried any acid toners? Leave your recommendations below! 

RachelElizabeth

Bronzing vs. Contouring | Differences and My Favourite Products – Blogmas Day #11


In a recent blogger twitter chat, the topic was contouring. It was when a few people expressed confusion over what contouring actually is and how it differs from bronzing. I am not claiming to be a makeup artist, but over the years of watching my fair few YouTube videos and reading blogs, I feel I have a firm grasp on all of this. So today I thought I would discuss in detail how I like to sculpt and warm up my face, and hopefully some of you may find this useful…


So, let’s start with bronzing. The easiest way to think about bronzing is to use it as a way to warm up the skin. I like to out bronzer on the high points of the face – in other words, where the sun would naturally hit. As you hopefully can tell in the picture above, my skin is warmest on the cheeks, temples and forehead. If I’m going for a super bronzed look, then I will hit the bridge of the nose as well. Effectively, this application of bronzer is to mimic a tan, or a sunkissed glow. It also helps to bring colour to the face and keeps it from being one flat colour, which can sometimes look unnatural. It is also handy to bronze down the neck, as for many of us, that is much lighter than the rest of the body. This can help make the transition from your face to your neck look a lot more seamless and, again, natural. My favourite bronzer – one I have mentioned many times and even dedicated a whole blog post to here – is the Nars Bronzing Powder in Laguna. For my skin tone (I go between a NC20 and NC30), this is the perfect colour, but this obviously will be different for everyone. For application, I love the Real Techniques Blush Brush – the tapered end allows for precise application, but the rest of the bristles help to blend it seamlessly. 
Moving on to contouring, this is arguably the most popular trend in makeup right now. There are constant pictures on Instagram of the extreme intense cream contouring a la Kim Kardashian, but today I thought I’d discuss a more wearable version. Contouring is sculpting the face – you create depth and dimension by mimicking shadows and darkening the areas on your face that you wish to recede. The most common place to contour is underneath your cheekbones, which I have done fairly naturally in the picture above. To find where to contour your cheekbones, you can suck in your cheeks to make the typical fish face, or a pretty foolproof method is to imagine a line from the top of your ear to the corner of your mouth. To make this look natural though, I would never bring this colour past the middle of the cheek – if you a imagine a line going straight down from your pupil, you don’t want to have any shadow past that. You can also contour other parts of your face, depending on what suits you and where you would like to sculpt. A popular place is also the nose, but I feel like this is something quite difficult to master and make look natural. If you want a more pouty-looking lip, you can apply a little underneath your bottom lip which will make it look fuller. These are only a few ways to contour, and the possibilities are endless.
Personally, I think the most natural method for contouring is using a powder. When looking for one, you want to find one that is a lot more cool-toned than your bronzer – i.e. it should look considerably more grey in tone. This is because this will look more like a natural shadow rather than an orangey-toned line on your cheek. It is also essential that your powder is matte, as any shimmer will bring attention to the area, when the key is to make it recede and draw attention to the highlighted or non-contoured parts of the face. My go-to contour product is the Mac Harmony Blush, and I would see this being perfect for fair to medium skin tones. My favourite brush for contouring is the Sigma F35 Tapered Highlighter Brush – it is tapered enough that it only applies a small concentrated amount of product, but much like the Real Techniques brush, the outer bristles help to blend everything out. 
I hope this rather wordy post has been somewhat useful to you, and if I haven’t explained myself very clearly then please let me know! It’s important to remember that the key to contouring, like any aspect of makeup, is practice. Nobody gets it perfect on their first try, and part of the fun of makeup is experimenting and finding what’s best for you. Do you love contouring and bronzing as much as me? 
RachelElizabeth

Makeup for Photography | Blogmas Day #10


With the festive season well and truly underway, it’s likely that many of you will be invited to more events than usual. Whether they’re nights out, christmas parties, or general reunions, you will probably encounter some sort of camera, and when you put so much effort into your makeup when getting ready, you want to make sure you’re camera ready. I’ll admit I’m not often photographed, but after many club nights and their ‘professional’ photos, I’ve picked up a few key tips that I thought I would share with you…

Avoid SPF
It’s a well-known fact in the beauty world that the ingredients that make up sun protection (zinc oxide and titanium dioxide to be exact) can cause flashback in photography. Have you ever looked back at pictures of yourself and though that your face looked extremely pale and ghostly compared to your face? This could be the reason. You need to check all products you use – moisturiser, primer, foundation and powder should ideally be sans-SPF. Having said this, some products with SPF that I own photograph beautifully (L’Oreal True Match being one of those), but if you’ve never tested them, it’s safer to err on the side of caution. My favourite foundation for photography is by far the Giorgio Armani Luminous Silk Foundation – I am wearing it in both the pictures above, and – if I do say so myself – I think it captures the light beautifully, leaving my skin looking glowy and healthy. 
Contour, Contour, Contour
Features can definitely get lost in photos, so I definitely make sure to bring back colour and definition to my face. I am planning on doing a post all on contouring soon, but to keep things short and simple, I use Mac Harmony Blush with a Sigma F35 Tapered Highlighter Brush to sculpt out my cheekbones and temples. I also find it important to bring back some warmth and colour to my skin, so to the high points of my face (i.e. where the sun would naturally hit) I apply bronzer – usually Nars Bronzing Powder in Laguna. I also always apply blush, as you can sometimes look a little washed out and lost in photos. All these steps are done with a much heavier hand than I would ever do in the daytime in order for them to even show up in pictures. This also means you have to spend a little longer blending everything out, and I like to just go back over everything with the brush I used for my foundation.
Define those Eyes
You don’t necessarily need to be the master of smokey eyes to look great in pictures. I think the most important element of your eye makeup is defining the upper lash line. I personally love to line my eyes with a gel liner – something like the Mac Blacktrack Fluidline. It is equally important to tight line – this is lining the inside of the eye. I find this a little unflattering on the lower waterline, but doing it on the upper really helps to darken the lash line and create drama. Lashes are also a must for me; they make your eyes stand out and really pop in photos. My ultimate favourites for my eye shade are the Ardell Demi Wispies. My final tip is to give some love to your eyebrows. I tend to go in much heaver with my brow pencil, my favourite being the Anastasia Beverley Hills Brow Wiz in Taupe. As you can see from the pictures I still don’t go over the top, but they are lot more defined than I would go for an everyday look. 
Hopefully this post has been somewhat useful or interesting and I hope that you can use some of these tips when you’re next being photographed! I am by no means claiming to be an expert, and I am completely self taught. Have you got any tips for makeup for photography?
RachelElizabeth

Tom Ford Leonardo | Review and Swatches – Blogmas Day #9


Tom Ford created a bit of a frenzy recently with the release of his Lips and Boys collection. 50 lipsticks only available for a few days… How could I resist? Since I am trying to save money right now (and I am constantly reminding myself that I am a student) I limited myself to just one shade. After way longer than I wish to admit, I had analysed every shade in the collection and finally picked myself up the gorgeous deep red that is Leonardo
Leonardo is a very me shade, and that’s probably why I ended up picking it. It’s a dark red that’s a little bit of the blue-toned side, but less so that your typical deep red. I only have two other lipsticks from the brand, but I just can’t get over the formula of these. They come with a hefty price tag, but I don’t think it’s until you actually apply them that you really understand why. Obviously the packaging is truly drool-worthy, but these are probably the most creamy and luxurious lip products out there. The pigmentation is great and the lasting power is decent considering the formula (not that I mind whipping it out and reapplying).
The only thing to bear in mind about this collection – I believe it’s coming out again on the 26th December fyi – that the lipsticks are a bit smaller than the originals. They are 0.07 oz as opposed to 0.10 oz, which does actually make them better gram for gram, but it’s important to remember that you aren’t getting as much. The Lips and Boys lipsticks are £26, whereas the original lip colours are £37, so it is a considerable saving.

I for one will definitely be stalking the Selfridges website on Boxing day for these lipsticks. There were so many shades that I wanted and I am considering giving myself a nice post-christmas treat! Did you manage to snag any of these? What were your favourite shades?
RachelElizabeth

Manicure Monday #26 | Mac Nail Lacquer in Soiree – Blogmas Day #8

When you think of Mac, nail polish is not the first thing that springs to mind. They have quite a bad reputation in the YouTube and Blogging worlds – they’re known for being quite expensive for something that is not that great. Now I believe it was the Cham-Pale collection from a good few years ago now, and I was checking out all the products on Temptalia (as always) when I saw this gorgeous shimmery light rose gold-esque shade and I knew it had to be mine…


Mac Soiree is described as a ‘sparkly light bronze gold’ and luckily for you and me it is now part of the permanent collection. This has to be one of my favourite nail polishes in my collection. It is incredibly easy to work with; it applies opaquely with one coat and never, ever goes streaky. The pigmentation on this is amazing, and its a go to polish for me when I haven’t got much time as it looks perfect without any effort. Let’s not forget that the colour on this is also spot-on for this time of year – it’s sparkly and fun, but not over the top.

RachelElizabeth

Bourjois Rouge Edition Velvet in Grand Cru Review and Swatches | Blogmas Day #7


You may remember, that I have already tried one of these. I have the shade Hot Pepper and I am in love – read my full review here. I had been meaning to pick up another shade for a while now, and on a trip to Boots, I was browsing the Bourjois stand and I decided to pick up one that really caught my eye. It’s safe to say that this was definitely disappointing.

The Bourjois Rouge Edition Velvet Lipstick in Grand Cru in the packaging looks like the most stunning deep red, which is one of my favourite types of shade to wear. So you can imagine my disappointment when applying this, to be left with quite a streaky, sheer finish. Hot Pepper was bright, opaque and looked so smooth on the lips, but unfortunately this was the complete opposite. It clung to dry patches and just generally looked quite bad. However, I did find when I used light layers of it and worked it into the lips it could be a nice stain on the lips, and in the picture below, I had applied several layers to even get that finish. Whilst I can still wear it in that way, I don’t think I will find myself reaching for this over any other dark reds I have, as it wasn’t the dark matte red I was hoping for.

It’s not nice giving a bad review of a product, but sometimes it just has to be done. What has upset me the most about this is that I love another shade in the range, and have heard so many people praise the rest of it. There are still some shades that I have my eye on, and I won’t (and neither should you) be put off by one dud shade. Have you tried any from this line?

RachelElizabeth

Top 5 Luxury Products | Blogmas Day #6


It’s that time of year when you can subtly ask your loved ones for those products that you really can’t justify spending your hard-earned cash on. Or maybe you do want to part with your cash but you So today, I wanted to bring to you my favourite luxury products, and ones I think that are really worth it…


We’ll begin with one that I have continually praised – the Hourglass Veil Mineral Primer (full review here). This stuff is magic. If you have oily skin or you have trouble with your foundation’s longevity in general, then you will love this. This was such a game-changer in my makeup routine that this is my third bottle, and as you can see from the picture, it is on its last legs. When I feel a bit guilty about how much it costs and how quickly I go through it, it is also the perfect product for special occasions. The other base product that had to be mentioned was the Giorgio Armani Luminous Silk Foundation (I have also reviewed this in full here). This is the closest to perfect foundation that I have found. It has a natural finish – somewhere in the middle of matte and dewy. It lasts incredibly on me (especially when paired with the aforementioned primer), and best of all, looks stunning in photographs. This is another product I save for special occasions, but if I could afford to, I would wear this on an everyday basis. 
Moving on to colour products, the first I will mention is the Nars Bronzing Powder in Laguna which I dedicated a whole post to recently here. Nars products aren’t quite as expensive as the other brands I’ve mentioned, but it is definitely still luxury. For my complexion, this is the perfect shade to warm up the skin, and the texture and longevity are both incredible. For eyes, the Charlotte Tilbury Colour-Coded Eye Shadow Palette in Dolce Vita is the ultimate in luxury. I definitely plan on writing a whole post on this soon, as it is so stunningly pigmented and perfect for this time of year. She has several different quads if these warm tones aren’t your thing, and they are all beautiful. The final product I will mention are the Tom Ford Lipsticks. I have a few, but the one photographed is Wild Ginger (full post here) which is an extremely vibrant orangey-red. The formulation of these are so pigmented and creamy, and are just a pleasure to apply and wear.
These may not be something that you can easily go out and purchase on a whim, but if you’re in the market to splurge or want to treat someone with something very special, then these would be what I recommend. What are your favourite luxury products?
RachelElizabeth

An Unexpected Combination | Blogmas Day #5


I am all about mixing foundations. Whether it’s to get the perfect shade, or getting the best out of two formulas, sometimes you just have to in order to find the perfect base. Recently I mixed two foundations that were from opposite ends of the spectrum both in terms of finish and and price-point, and I ended up discovering and absolute gem…

The foundations in question are the Hourglass Immaculate Liquid Powder Foundation (full review here) and my recent favourite Max Factor Skin Luminizer Foundation (also full post here). If you read my posts on these, you can see that these are both favourites of mine, but for very different reasons. The Hourglass offering is perfect for oily skins – it is incredibly mattifying, long-lasting and has great coverage. In opposition, the Max Factor foundation is dewy skin in a bottle, and has light to medium coverage. I have the former in a pale shade for when I am sans-fake tan, and the latter in a much darker shade. 
My tan was slightly faded, so I needed to create my own custom colour. The reason I choose these two was because, surprisingly, they have a very similar texture. They both are slightly moussey and whipped. Once I mixed them together on the back of my hand, and applied it with a Real Techniques Buffing Brush, was when the magic happened. The result was a natural-looking finish – right in the middle of matte and dewy. It also lasted perfectly throughout the day, and stayed looking luminous and fresh. 
I hope this post inspired you, if you don’t already, to start experimenting and mix your foundations as you may just uncover something incredible. What’s your favourite unexpected beauty trick? 

RachelElizabeth

Mac Keepsakes / Plum Eye Bag | Review, Swatches and Eye Look! Blogmas Day #4


I have to admit, I don’t usually pay much attention to the Mac Christmas collections. They come out with so many collections these days and I’m just not as into following them as I used to be. That being said, I was very pleased and excited to receive one of the eye kits for my birthday from some lovely friends as I hadn’t tried any of the products that came with it…
The Mac Keepsakes / Plum Eye Bag contains three eye products: an Extra Dimension eyeshadow duo in the shades Triple Impact and Round Midnight, a powerpoint eye pencil in the shade Permaplum, an In Extreme Dimension Lash mascara and they all come in an amazing limited edition glittery black makeup bag. Only the eyeshadows from this set are limited edition, so the eyeliner and the mascara are available to purchase all year round. 
I’ve always been intrigued by the Extra Dimension eyeshadows that Mac often bring out with collections. They always contain this stunning raised swirl pattern, and the formula is very unique. It feels somewhere between a cream and a powder – it feels much creamier and smoother to touch that a standard powder eyeshadow but it isn’t actually a cream product. Triple Impact is described as an ‘Opalescent Pink’ – it has a pale pink base and with a blue-purple duochrome running through it, so it looks different colours when it catches the light. Round Midnight is described as a ‘Rich Reddish Plum’ – to me it is a blackened purply-plum shade, that also catches the light beautifully. These are both metallic and shimmery eyeshadows, so if you’re not a fan of sheeny glittery lids then these may not be for you. They are both nicely pigmented, although I would say Round Midnight is more so, and it is definitely my favourite of the two.
I’ve actually never tried an eye pencil from Mac, let alone a Powerpoint Pencil, so I was very intrigued about this one. Permaplum is described as a ‘Deeply Plum with Dark Shimmer’, but to me it is a blackened very blue-toned purple and has a soft sheen to it, rather than any noticeable shimmer or glitter. It is an incredibly creamy formula, which is easy to smudge out to create soft smokey looks. It does set, but it does give you a lot of time to work with. For me this seems like a pencil you use on the lashlines rather than the waterline. 
Much like eye pencils, I have never delved into the world of Mac mascaras as they often don’t get high appraisal in the blogging and YouTube worlds. The In Extreme Dimension Lash is supposed to be largely a volumising formula, which I would definitely agree with. I didn’t get a whole lot of length with this, and I found it a little messy to use as initially it is a very wet formula. The wand reminds me very much of the Benefit They’re Real Mascara as it’s a plastic wand with short bristles and has the extra bristles on the tip of the wand to aid lower lashes and inner corners etc. I don’t think I’ve quite made my mind up on this one, as I feel that if may get better once it has dried up a little. Right now I think it’s okay; it’s not my favourite.
Below I’ve included pictures of all the products used on my eyes. I used Round Midnight all over the lids and Triple Impact  on the inner corner. I blended a little of Mauve from the Lorac Pro Palette (full post here) into the crease and along the lower lashline. for some added definition and to ground the look. I lined the upper lashline and the outer half of the lower lashline with Permaplum and finished off the look with the In Extreme Dimension Lash.  

All in all, I think this definitely a set worth buying if you (or someone you are buying a gift for) love purple-toned eye makeup or is looking to experiment with colour. It’s also a great way to try a few new Mac products for much better value. I definitely give this gift set a thumbs up. What are your thoughts on this year’s Mac Christmas collection?

RachelElizabeth

Nuxe Reve De Miel Review | Blogmas Day #2


Here we have yet another purchase from a Parisian pharmacy. Although Nuxe is by no means hard to access in the UK, it is considerably cheaper in France, being a French brand. I have been meaning to try this cult lip balm for the longest time now, and I thought my trip to Paris was the perfect excuse…


The Nuxe Reve De Miel is a interestingly-textured lip balm. A lot of people describe it as slightly gritty which I get because it’s so thick and almost waxy, but it is very smooth in consistency. It has a matte finish which is perfect for those who don’t like the typical glossy or shiny look that lip balms can give (also making this ideal for guys!). What I love about this lip balm is that you can put it on before bed and you will wake up in the morning and still feel product on your lips, which I haven’t experienced with any other product. It is incredibly nourishing and hydrating and my lips are so thankful for this purchase. I love the anniversary packaging that I picked up, and the glass jar makes it feel very luxurious. It’s actually not too expensive at £9.50, and I personally think it’s worth every penny. 


I can definitely understand why this product has received cult status and I think it is well-deserved. If you struggle with dry lips – especially as we enter the colder months – this should definitely be added to your wishlist, ASAP. 


RachelElizabeth