Merry Christmas & Blogmas Roundup! | Blogmas Day #24

So I did it! 24 daily blog posts… It got difficult towards the end and my scheduling was off, but I did it. Despite it being a little stressful at times, I have to admit that I’ve really enjoyed doing it, and it was well worth the challenge. I’ve also had the most amazing month and the festive period has got me feeling really grateful, so thank you to anyone who has ever read any of my posts! I thought I would round up Blogmas with my favourite posts of the series…


And finally I want to wish you all a very Merry Christmas or whatever holiday you celebrate. I’m going to spend the next few days with my family, away from my uni work and the blog, because it just feels good to have a break sometimes. What are your plans for Christmas?

RachelElizabeth

In Flight Essentials | Blogmas Day #18


Ever since watching Lisa Eldridge’s In Flight YouTube Video I have been obsessed with the idea of having an in flight beauty routine. I don’t think I’m quite at the stage where I’ll be doing every step, but I’m definitely going to be stepping up my hydration game. I also have a few must haves that I also bring with me on any flight, especially when it is long haul…


I am keeping it quite simple for the skincare. This is probably the only time when I will actually use make up wipes to remove my makeup, but who wants to go to the airplane bathroom and wash their face off? I am using the Simple Cleansing Facial Wipes, just because I have had good luck with them in the past. I’m also bringing the GlamGlow ThirstyMud Mask and I plan on applying this after removing my makeup, and continue to reapply once it has sinked in. The goal is to stop my skin from drying out from the plane air.

An absolute must have on flights is headphones – whether I’m watching films or listening to music, I have to be listening to something. My form of entertainment this time will be Charles Dickens’ Bleak House which is just one of the books that I need to read before I go back to University in January. A final tip I have for anyone flying anytime soon is that if you are a contact lens wearer like myself, make sure you also bring your glasses. The air on the plane is so drying that it will dry out your contacts and can make your eyes really sore.

I think I am surprisingly simple when it comes to an in flight routine, but I honestly can’t be too bothered with faffing around. I tend to bring my makeup in my hand luggage so I’ll be able to touch up before I land. Have you got any essentials for flying?

RachelElizabeth

What’s in my Travel Haircare and Body Bag | Blogmas Day #17

Today is the third instalment of my travel bag series, and today I bring you my body and haircare goodies. Now compared to the previous posts, these are far smaller categories for me. I’m not big into hair, and I tried to keep it quite simple when it came to body…


Hair
I love the Bumble and Bumble travel sets – I have bought the Surf one quite a few times now, as you get to try out three travel sized products for the price of one full size. This time, I decided to try out the Invisible Oil Set which includes a shampoo, a conditioner and the hair primer, which was something I’ve wanted to try for a long time now. It is essentially a heat protectant and a leave in conditioner – I will let you know my thoughts once I’ve tried. The other two products I have bought and two staples in my hair care routine. First we have the Charles Worthington Style Setter Dry Shampoo, which is one of my favourites – it is perfect for second (or third) day hair to soak up any oil, but its also great to freshen up and volumise the hair. I’m also bringing the Charles Worthington Volume and Bounce Texturising Spray, which I love to add extra volume and texture to the hair, to give a more lived in look. Finally, I am bringing my Tangle Teezer Compact which is perfect for travelling because it’s so small, and it’s really great at getting out tangles.  


Body
I’m actually only bringing two products with me on this trip, both of which I received in my You Beauty Advent Calendar. First is the Molton Brown Orange and Bergamot Shower Gel, which smells divine so I’m super excited to use this in the shower. Next up for a moisturiser I’ve packed the Caudalie Nourishing Body Lotion. This also feels great when I tried it on my hand, so I’m sure this will be a winner – again, I will definitely give my thoughts on this. 

For some reason, these are the two categories I get a bit lazy on whenever I go away – I am bringing my straighteners, but whether or not I’ll actually use them is a different story. Are any of you like that? Or do you still go all out with hair and body on your travels?

RachelElizabeth

What’s in My Travel Skincare Bag | Blogmas Day #16


In case you didn’t read yesterdays post, I am currently in New York! I thought I would take this opportunity to make a somewhat short travel series, and walk you through all the beauty goodies that I am hauling across the Atlantic with me. Today we are talking all things skincare…


It may not be the most travel-friendly option, but I couldn’t not bring the The Body Shop Camomile Cleansing Oil (full post) as it is my ultimate favourite makeup remover. I haven’t found anything that removes makeup quite like this does. For my cleanser, I am bringing a sample size of the Liz Earle Cleanse and Polish that I got in my You Beauty Advent Calendar – this actually used to be my favourite cleanser, so I’m quite happy to have this back in my life. Next up we have another also slightly bulky product – the First Aid Beauty Facial Radiance Pads. I reviewed this only a couple of days ago here, and the convenience of them definitely made me take them on my trip. The final basic product I am taking is the Kiehls Ultra Facial Moisturiser, which is just a really simple effective lotion. 

Because I’m a little worried that my skin will freak out after the 8 hour plane journey, I am bringing the big guns when it comes to fighting blemishes and dehydration. The La Roche Posay Effeclar Duo + has become a classic in my routine, and a serum that I constantly use on blemishes because it helps to reduce them without drying out the skin. For spot treatment, I am bringing the Aesop Control Gel which is a personal staple. A product that hydrates, helps any blemishes and is generally a life-saver is the BalanceMe Radiance Face Oil, so this is a must for me. The final product I am brining along with me is the Nuxe Reve De Miel lip balm as planes (and cold weather) really take a toll on my lips. 

This isn’t the most travel-friendly skincare bag, but as I’m not too strapped for space on this trip, I was more concerned on bringing products that would really help my skin. I’m also brining a few extras for an in-flight routine, but that’s a whole other blog post…

RachelElizabeth

Manicure Monday #27 | Essie Lots Of Lux | Blogmas Day #15


If there’s any time of year that you can get away with obnoxious glitter on your nails, then it’s definitely now. I don’t tend to use any when it’s not the festive period, so my nails are often constantly sparkling. I was lucky enough for my boyfriend to give me the You Beauty Advent Calendar for my birthday, and amazingly, one day brought me this stunning Essie polish! It’s safe to say, that it was almost immediately on my nails, because, let’s be honest it looks absolutely gorgeous. 


Lots of Lux is described as a ‘shimmering lapis lazuli with a superfine matte finish’. I think the comparison to a gemstone is very apt here – it looks so interesting on the nails. It’s not a smooth finish, it definitely textured on the nails, but I think this is what makes it unique. It was very opaque, and although I did two coats, I probably could have got away with one. It is a nice formula, and stayed pretty chip free for a while.

So if you’re looking for a nice glamorous glitter this festive season, then definitely consider looking trying out Essie. What is your favourite glitter formula?

RachelElizabeth

First Aid Beauty Facial Radiance Pads | Review – Blogmas Day #12


If you didn’t already know, I am little obsessed with skincare, and this rather unfortunate for someone who has a somewhat limited student budget. I am all for the philosophy that you should invest in skincare – and I also think this is important for any age. Looking after your skin and making it look its best is not only hugely confidence-boosting, but also makes the application of makeup that much more flawless. After quite a bit of experimentation, I am really starting to learn what my skin does and doesn’t like, and I have come to the conclusion that it just can’t get enough of acid exfoliation.


The First Aid Beauty Facial Radiance Pads are essentially thin pads soaked in a liquid exfoliant with its main acids being lactic acid and glycolic acid. Within my skincare routine (stay posted for a full updated post coming soon), the liquid exfoliant comes after cleansing the skin. I was really intrigued by these pads as it seemed like a convenient way to do this step. The pads come incredibly saturated with product, more than enough to use all over the face and the neck. The way I like to use these is to gently rub in circular motions, and I especially like to concentrate the product on any active breakouts. 

After using these for a while now, I definitely find that they help with calming and ridding of breakouts, as I find that many exfoliating toners do. I also feel that they leave my skin looking brighter and fresher, and feeling ultimately a lot smoother. They claim that these are suitable for sensitive skin (which I personally think means absolutely nothing) but if your skin isn’t used to exfoliating toners then I would probably only suggest to use these daily. I personally like to use these in the morning as, for some reason, I think its easier to grab one of these than soak my own cotton pad in another toner… I will then use a different toner at night. 

Overall I think these pads are a great way to exfoliate the skin without using those really intense and vigorous manual scrubs. If you’ve got acne-prone skin, I think you definitely need to give some sort of liquid exfoliant a go – since I’ve started using them they have done absolute wonders for my skin. Have you tried any acid toners? Leave your recommendations below! 

RachelElizabeth

Bronzing vs. Contouring | Differences and My Favourite Products – Blogmas Day #11


In a recent blogger twitter chat, the topic was contouring. It was when a few people expressed confusion over what contouring actually is and how it differs from bronzing. I am not claiming to be a makeup artist, but over the years of watching my fair few YouTube videos and reading blogs, I feel I have a firm grasp on all of this. So today I thought I would discuss in detail how I like to sculpt and warm up my face, and hopefully some of you may find this useful…


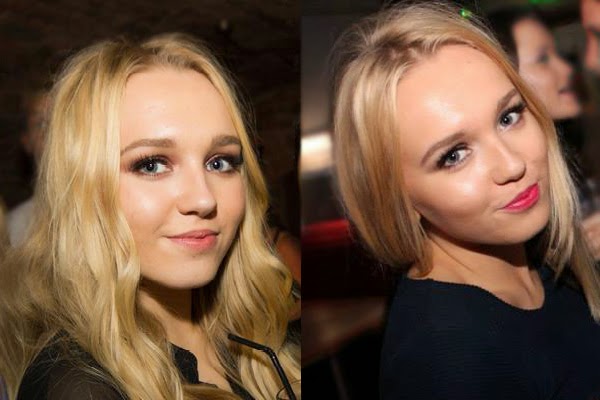
So, let’s start with bronzing. The easiest way to think about bronzing is to use it as a way to warm up the skin. I like to out bronzer on the high points of the face – in other words, where the sun would naturally hit. As you hopefully can tell in the picture above, my skin is warmest on the cheeks, temples and forehead. If I’m going for a super bronzed look, then I will hit the bridge of the nose as well. Effectively, this application of bronzer is to mimic a tan, or a sunkissed glow. It also helps to bring colour to the face and keeps it from being one flat colour, which can sometimes look unnatural. It is also handy to bronze down the neck, as for many of us, that is much lighter than the rest of the body. This can help make the transition from your face to your neck look a lot more seamless and, again, natural. My favourite bronzer – one I have mentioned many times and even dedicated a whole blog post to here – is the 
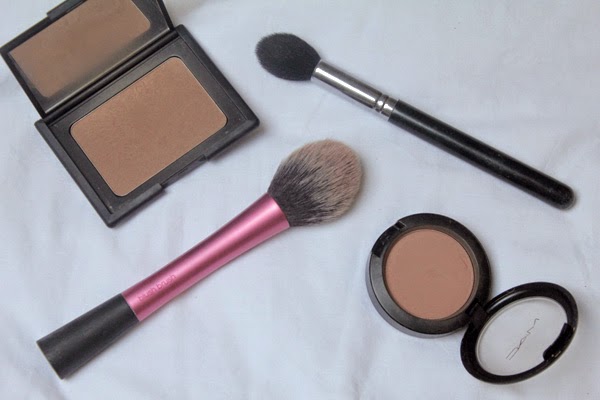
Nars Bronzing Powder in Laguna. For my skin tone (I go between a NC20 and NC30), this is the perfect colour, but this obviously will be different for everyone. For application, I love the Real Techniques Blush Brush – the tapered end allows for precise application, but the rest of the bristles help to blend it seamlessly. 
Moving on to contouring, this is arguably the most popular trend in makeup right now. There are constant pictures on Instagram of the extreme intense cream contouring a la Kim Kardashian, but today I thought I’d discuss a more wearable version. Contouring is sculpting the face – you create depth and dimension by mimicking shadows and darkening the areas on your face that you wish to recede. The most common place to contour is underneath your cheekbones, which I have done fairly naturally in the picture above. To find where to contour your cheekbones, you can suck in your cheeks to make the typical fish face, or a pretty foolproof method is to imagine a line from the top of your ear to the corner of your mouth. To make this look natural though, I would never bring this colour past the middle of the cheek – if you a imagine a line going straight down from your pupil, you don’t want to have any shadow past that. You can also contour other parts of your face, depending on what suits you and where you would like to sculpt. A popular place is also the nose, but I feel like this is something quite difficult to master and make look natural. If you want a more pouty-looking lip, you can apply a little underneath your bottom lip which will make it look fuller. These are only a few ways to contour, and the possibilities are endless.
Personally, I think the most natural method for contouring is using a powder. When looking for one, you want to find one that is a lot more cool-toned than your bronzer – i.e. it should look considerably more grey in tone. This is because this will look more like a natural shadow rather than an orangey-toned line on your cheek. It is also essential that your powder is matte, as any shimmer will bring attention to the area, when the key is to make it recede and draw attention to the highlighted or non-contoured parts of the face. My go-to contour product is the Mac Harmony Blush, and I would see this being perfect for fair to medium skin tones. My favourite brush for contouring is the Sigma F35 Tapered Highlighter Brush – it is tapered enough that it only applies a small concentrated amount of product, but much like the Real Techniques brush, the outer bristles help to blend everything out. 
I hope this rather wordy post has been somewhat useful to you, and if I haven’t explained myself very clearly then please let me know! It’s important to remember that the key to contouring, like any aspect of makeup, is practice. Nobody gets it perfect on their first try, and part of the fun of makeup is experimenting and finding what’s best for you. Do you love contouring and bronzing as much as me? 
RachelElizabeth

Makeup for Photography | Blogmas Day #10


With the festive season well and truly underway, it’s likely that many of you will be invited to more events than usual. Whether they’re nights out, christmas parties, or general reunions, you will probably encounter some sort of camera, and when you put so much effort into your makeup when getting ready, you want to make sure you’re camera ready. I’ll admit I’m not often photographed, but after many club nights and their ‘professional’ photos, I’ve picked up a few key tips that I thought I would share with you…

Avoid SPF
It’s a well-known fact in the beauty world that the ingredients that make up sun protection (zinc oxide and titanium dioxide to be exact) can cause flashback in photography. Have you ever looked back at pictures of yourself and though that your face looked extremely pale and ghostly compared to your face? This could be the reason. You need to check all products you use – moisturiser, primer, foundation and powder should ideally be sans-SPF. Having said this, some products with SPF that I own photograph beautifully (L’Oreal True Match being one of those), but if you’ve never tested them, it’s safer to err on the side of caution. My favourite foundation for photography is by far the Giorgio Armani Luminous Silk Foundation – I am wearing it in both the pictures above, and – if I do say so myself – I think it captures the light beautifully, leaving my skin looking glowy and healthy. 
Contour, Contour, Contour
Features can definitely get lost in photos, so I definitely make sure to bring back colour and definition to my face. I am planning on doing a post all on contouring soon, but to keep things short and simple, I use Mac Harmony Blush with a Sigma F35 Tapered Highlighter Brush to sculpt out my cheekbones and temples. I also find it important to bring back some warmth and colour to my skin, so to the high points of my face (i.e. where the sun would naturally hit) I apply bronzer – usually Nars Bronzing Powder in Laguna. I also always apply blush, as you can sometimes look a little washed out and lost in photos. All these steps are done with a much heavier hand than I would ever do in the daytime in order for them to even show up in pictures. This also means you have to spend a little longer blending everything out, and I like to just go back over everything with the brush I used for my foundation.
Define those Eyes
You don’t necessarily need to be the master of smokey eyes to look great in pictures. I think the most important element of your eye makeup is defining the upper lash line. I personally love to line my eyes with a gel liner – something like the Mac Blacktrack Fluidline. It is equally important to tight line – this is lining the inside of the eye. I find this a little unflattering on the lower waterline, but doing it on the upper really helps to darken the lash line and create drama. Lashes are also a must for me; they make your eyes stand out and really pop in photos. My ultimate favourites for my eye shade are the Ardell Demi Wispies. My final tip is to give some love to your eyebrows. I tend to go in much heaver with my brow pencil, my favourite being the Anastasia Beverley Hills Brow Wiz in Taupe. As you can see from the pictures I still don’t go over the top, but they are lot more defined than I would go for an everyday look. 
Hopefully this post has been somewhat useful or interesting and I hope that you can use some of these tips when you’re next being photographed! I am by no means claiming to be an expert, and I am completely self taught. Have you got any tips for makeup for photography?
RachelElizabeth

Tom Ford Leonardo | Review and Swatches – Blogmas Day #9


Tom Ford created a bit of a frenzy recently with the release of his Lips and Boys collection. 50 lipsticks only available for a few days… How could I resist? Since I am trying to save money right now (and I am constantly reminding myself that I am a student) I limited myself to just one shade. After way longer than I wish to admit, I had analysed every shade in the collection and finally picked myself up the gorgeous deep red that is Leonardo
Leonardo is a very me shade, and that’s probably why I ended up picking it. It’s a dark red that’s a little bit of the blue-toned side, but less so that your typical deep red. I only have two other lipsticks from the brand, but I just can’t get over the formula of these. They come with a hefty price tag, but I don’t think it’s until you actually apply them that you really understand why. Obviously the packaging is truly drool-worthy, but these are probably the most creamy and luxurious lip products out there. The pigmentation is great and the lasting power is decent considering the formula (not that I mind whipping it out and reapplying).
The only thing to bear in mind about this collection – I believe it’s coming out again on the 26th December fyi – that the lipsticks are a bit smaller than the originals. They are 0.07 oz as opposed to 0.10 oz, which does actually make them better gram for gram, but it’s important to remember that you aren’t getting as much. The Lips and Boys lipsticks are £26, whereas the original lip colours are £37, so it is a considerable saving.

I for one will definitely be stalking the Selfridges website on Boxing day for these lipsticks. There were so many shades that I wanted and I am considering giving myself a nice post-christmas treat! Did you manage to snag any of these? What were your favourite shades?
RachelElizabeth

Manicure Monday #26 | Mac Nail Lacquer in Soiree – Blogmas Day #8

When you think of Mac, nail polish is not the first thing that springs to mind. They have quite a bad reputation in the YouTube and Blogging worlds – they’re known for being quite expensive for something that is not that great. Now I believe it was the Cham-Pale collection from a good few years ago now, and I was checking out all the products on Temptalia (as always) when I saw this gorgeous shimmery light rose gold-esque shade and I knew it had to be mine…


Mac Soiree is described as a ‘sparkly light bronze gold’ and luckily for you and me it is now part of the permanent collection. This has to be one of my favourite nail polishes in my collection. It is incredibly easy to work with; it applies opaquely with one coat and never, ever goes streaky. The pigmentation on this is amazing, and its a go to polish for me when I haven’t got much time as it looks perfect without any effort. Let’s not forget that the colour on this is also spot-on for this time of year – it’s sparkly and fun, but not over the top.

RachelElizabeth