Eye Brushes | My Favourites

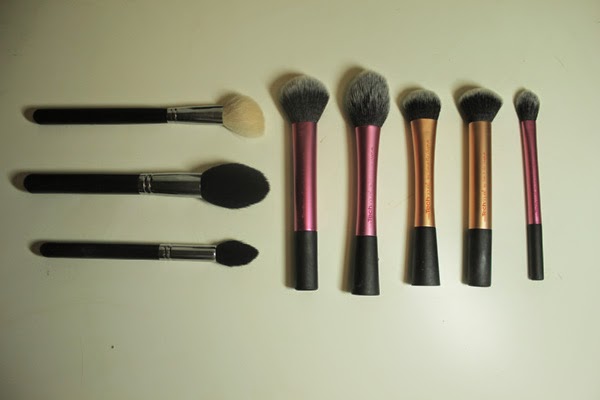
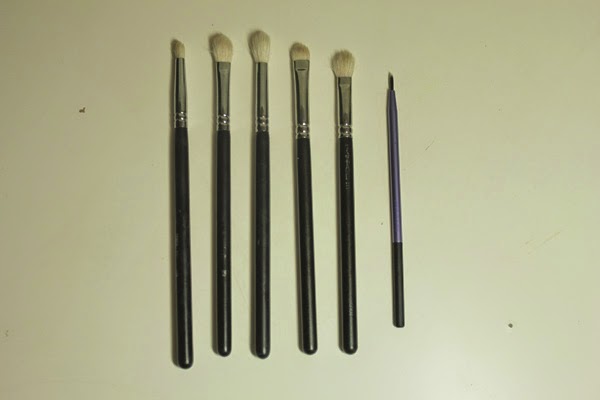
Today I bring you part two of my brush series. In case you missed it, yesterdays post rounded up my favourite face brushes (read it here). Now its only fair that we dedicate a post to eye brushes. The line up again consists of brushes from Sigma and Real Techniques but today we have a couple of Mac thrown in there…

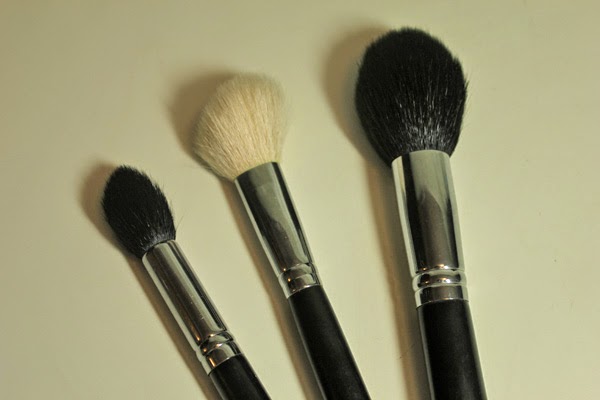
Beginning with Sigma, my first favourite is the E30 Pencil Brush. This I primarily use for applying shadow on the lower lash line or smoking and smudging out eye liner. This is an absolute essential for any smokey eye.

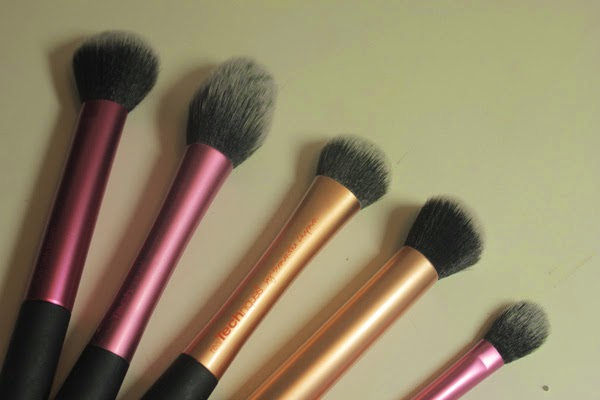
The next three brushes are essential for blending. The Sigma E25 Blending Brush is a godsend when it comes to applying colour to the crease of the eye. If you don’t have a brush like this you need one asap. Something about the slightly tapered shape and the texture just does the work for you, and you will be a blending pro in seconds. The Sigma E35 Tapered Blending Brush is the E25’s slightly fluffier counterpart. I use this with no extra product on the brush and blend out the edges of an eye look. The final blending brush is the infamous Mac 217. This is practically identical to the E25, but I find it definitely comes in handy having more than one blending brush on hand – especially when more elaborate eye looks come into play.

Possibly my favourite eye brush is the Mac 239. This is perfect for packing on shadows on to the lid as it deposits the right amount of shadow. This is great for both pressed and loose shadows, and I am just in love. I personally think this is a Mac brush worth investing in as it works better than any other flat shader brush I’ve tried, including the Sigma.

Finally, we have the Real Techniques Fine Liner Brush. This has fast become my favourite brush to use with gel liner, because, as the name would suggest, the tip is incredibly fine. It makes it so easier to create thin precise line, but it is still easy to build up the thickness and intensity. It also cleans really easily which is ideal as gel liner can be quite stubborn on brushes. 

Thankfully this post was far more concise than yesterdays, and I hope that you found this mini series somewhat useful or interesting! What are your go-to brushes?

RachelElizabeth

Face Brushes | My Favourites


Tools are something that I have never really addressed on the blog, but I am a firm believer in the importance of makeup brushes. Now I’m not talking investing mega bucks – as you will see all the brushes I mention in this post won’t dent your bank balance too badly, and they are definitely worth trying out.


(Sigma F35, F40, F20)

Let’s begin with Sigma. This is where my love affair for makeup brushes began. When Sigma first launched their brush range and when everyone on YouTube was working for them and raving about how incredible they were (and how they were dupes for Mac brushes) I had to get myself a kit. Several years later, I now own more brushes from Sigma than I’ll ever need and there are 3 face brushes that really stand out to me.

The F25 Tapered Face Brush has become my go-to brush for applying face powder. Because of the way its shaped, it only picks up a small amount of product on the tip of the brush. This makes it impossible to apply too much powder to the skin which could make you look cakey. What it is also great for is a more precise application of powder than a typical big fluffy powder brush, and makes it easier to apply powder in more difficult-to-reach areas such as under the eyes and around the nose. This brush is also incredibly soft and is a dream to apply product with.

Next up is the F40 Large Angled Contour Brush which I love for applying blush. I know that it is called a ‘contour’ brush, but sometimes the beauty in brushes is to use for whatever you think is best. For me, this is the perfect size and shape for my cheek and deposits the right amount of product. I do like to wear quite a lot of blush, so if you prefer a little less punch, I would say to go for some sort of duo fibre brush which will help to sheer out the colour. This brush blends product seamlessly and I just love it. 

The final Sigma brush in the line up in the F35 Tapered Highlighter Brush. I actually do like using this brush for its intended purpose – highlighting. The point is fine enough that it applies the perfect amount of highlighter to the tops of the cheekbones, down the bridge of the nose and any other high points of the face. However, I also love this for the exact opposite – contouring. Again the tapered tip allows for precise application, but it is soft enough to blend out as you apply so you don’t end up with a brown stripe on your cheek.


(Real Techniques Multitask, Blush, Expert Face, Buffing, Setting)

Moving on to the ever popular Real TechniquesUndoubtedly, they are the brush brand of the moment, and its well deserved. They are affordable, great quality and not to mention they are made by some of my favourite YouTubers. Right now, there are five brushes that really stand out for me.

Beginning with one of the newest addition to my arsenal, the Multitask Brush. As the name suggests, this can be used for pretty much anything. I predominantly use it for blush – although I already credited the Contour Brush as great for blush, but if you’re anything like me and like to change up your blush colour, its always nice to have a few to chop and change from.

The Blush Brush is my go to for bronzer (controversial, I know). For me, it’s the perfect size to bronze up the face as it  covers quite a large surface area and makes application foolproof. As with all the Real Techniques brushes, its ridiculously soft which makes it that little bit more satisfying to use.

Lumping the next two into one, my go to foundation brushes are the Expert Face Brush and the Buffing Brush. They are very similar, but the Expert Face is a little denser, meaning you get a little bit more coverage, but the finish is pretty much the same. The main difference is that currently only the Expert Face is available to purchase individually, so that may sway your purchase…

Last but not least the Setting Brush. Again, my favourite use for this brush is not for what its intended for. What I use this for is for blending out concealer, both under my eyes and on the face. What is so great about this brush is that it removes any excess product so you don’t end up with cake face, and it blends it out to an airbrushed finish. It also eliminates the need to touch your face, being much more hygienic. 

Phew… Sorry for the very text heavy post, I clearly have a lot to say when it comes to brushes. And I’m still not done… Check back tomorrow for my favourite eye brushes.

RachelElizabeth

Manicure Monday #21 | Barry M Gelly Hi Shine Nail Paint in Chilli


I was really impressed with the autumn collection from Barry M this year. So much so, that I’ve already dedicated a post to the unique shade Mustard (here). Of course, when I was buying that shade there was an offer on Barry M in Boots, so naturally I picked up another…

Chilli is a really interesting shade. It isn’t your typical dark red with blue undertones, but rather it comes off quite brown. It’s surprisingly unique to my collection, and it definitely screams autumn. As I have mentioned over and over, the Gelly formula is impeccable, especially for the price. It has an incredible shine and wear time, and it is one of my all time favourite nail polish formulas.


If you are a fan of a dark red, I definitely suggest you give this slightly different one a try. What’s your favourite colour nail for autumn? 

-RachelElizabeth

Maybelline Color Drama Intense Velvet Lip Pencils | Swatches and Review

So last week, you may remember I wrote a rave review about Red Essential from the new Maybelline Color Drama Intense Velvet Lip Pencil range (in case you missed it, you can read it here). As you may have gathered from that post, I fell head over heels in love with it and I knew I had to pick up more shades to see if the formula was consistently as brilliant. It also helps that Boots are currently offering 3 for 2 on all Maybelline products…

Minimalist is probably my least favourite of the four I own. It is a light neutral pink, but what I’m specifically not too fond of is the slight golden shimmer running throughout. I also found the formula of this one a lot stiffer and dryer than the others and also lacked the intense pigment that all the rest have.  I also found that this wore off significantly faster that the rest in the range. I’m not saying that this is a complete dud – I will still wear it for a natural daytime look, but I was hoping for something much more creamy and opaque.

Nude Perfection is another one of those Kylie Jenner 90s lip colours that everyone is obsessed with right now. On me, it is a dark brown-toned nude with a slight hint of pink coming through. This one was extremely creamy and pigmented to apply and has a nice demi-matte finish. It was relatively long lasting, but didn’t hold up through eating quite as well as the brighter shades. I can definitely see this becoming one of my go-to lip shades.

Fuchsia Desire is a hot fuchsia pink with blue undertones. Out of all of the colours that I have picked up, I would say that this is the creamiest and smoothest to apply. It is extremely pigmented, but it also has a slight sheen and is not as matte as Nude Perfection or Red Essential. However, the shine does wear off when worn for long periods of time but the colour definitely sticks around, even through eating and drinking. This is a stunning shade if you’re into your hot pinks or you fancy giving one a go.
Minimalist
Nude Perfection


Fuchsia Desire


So on the whole, apart from Minimalist, this formulation has got my seal of approval. The consistency in the range is a little irritating, but I can overlook that due to some of the amazing shades they have got. This has got me very excited for the Soft Matte lipsticks that every single American blogger and YouTuber seem to be talking about at the moment to be released in the UK. We will probably be waiting a while though… Have you tried any of the colours from this range?

RachelElizabeth

Urban Decay Ink For Eyes | Review

Winged liner has always been my go-to look – I would even go as far as to say it’s my signature. For the past two years or so, I’ve been more focused on trying gel eyeliners, but I felt I wanted a change. I have very oily eyes so I struggle with eyeliners smudging, so I’ve been searching for my perfect inky black, waterproof and long-lasting eyeliner and when Urban Decay released a new liquid eyeliner, I knew I had to try it.

The Urban Decay Ink for Eyes is an inky-black felt tip eyeliner. As expected from Urban decay, it is incredibly black and pigmented. The tip is super fine, but as you can see in the picture below, mine is slightly frayed. This hasn’t however effected the precision of application as it hasn’t affected the whole brush but it is a bit of an inconvenience. I find it really easy to create thin and thick lines with this pen, and creating a wing is also really achievable. 


In terms of longevity, it definitely lives up to the claims. It is very waterproof – so much so that it can be difficult to remove. However, using an oil (such as The Body Shop Camomile Cleansing Oil post here) makes it much easier to break down the product and remove. It doesn’t transfer to my brow bone and stays looking perfect all day long.


Urban Decay is one of my favourite brands and it definitely hasn’t disappointed this time. Have you given any of the new eyeliners from the brand a go? My eye is now on the cream liner…

RachelElizabeth

theBalm Mary Lou Manizer | Review

There is something special about highlighter – it literally transforms the face. It adds an extra oomph to a makeup look, bringing out the high points of your face and giving you that glow in a more uniform way. If you love a glowy base as much as I do then you might want to listen up…

theBalm Mary Lou Manizer is these days a cult product among the Youtube and blogging worlds. It is a light beige with a golden sheen. The gold tones in this highlighter makes it perfect for those of us with warm skin with yellow undertones. However, I don’t find it to be overwhelmingly warm and I think it would work fine on someone with more pink undertones. This is quite an intense and pigmented highlighter, but can be easily applied with a light hand for more of a glow-from-within look. It looks almost glittery in the pan, but I don’t see that translated on the skin – it is more sheen than glitter. The texture is buttery and smooth to apply, and frankly I am in love. When it comes to application, I tend to focus it on the tops of my cheeks, down the bridge of my nose, cupids bow and under the brow. 
It’s surprisingly difficult to photograph highlighter, but after quite a heavy-handed application, the light bounced off it beautifully. If you’re a highlighter junkie and haven’t tried this one already, you really should. Have you ever tried anything from theBalm?

-RachelElizabeth

Manicure Monday #20 | Barry M Gelly Hi Shine Nail Paint in Mustard

If you are a regular reader of the blog, you may know my love for the Barry M Gelly Hi Shine Nail Paint formula (read my reviews of other shades here and here). It’s fast becoming one of my favourite nail polish formulas ever, so when I heard about their new autumn collection, I knew I had to check some of the shades out…

The shade Mustard is a very unique shade and not one that you often see brands release. It is a true mustard shade and the formula holds up to the usual expectations of the Gelly line – opaque, smooth to apply, incredible shine and long lasting. The funny thing about this shade is that in certain lights it can look almost like a nude or a neutral on me as my skin has quite strong yellow undertones. In brighter light however, it is much more striking and vibrant making this shade extremely versatile for me. It is definitely worth trying if you find yellow shades a bit too garish and want to try something a little bit more toned down.


I feel like this will be a very love it or hate it kind of shade, but personally I am a big fan. I can definitely see myself reaching for this during the rest of autumn. What are your thoughts on mustard nails?

RachelElizabeth

I Changed My Mind…

If you’ve been reading for a while, you may remember that I gave the Hourglass Ambient Lighting Powder in Dim Light a somewhat mediocre review (read it here). Now I don’t quite know whats changed in the past 7 months, but my opinion on this product has definitely changed a significant amount. Therefore I thought it necessary to bring you volume 2 of this review…

Let’s recap to when I used this product before. My skin was considerably oilier and I had far more imperfections. I thought that this added no coverage and didn’t aid at all to longevity. Forget everything I said. I have finally seen what the hype about this product is. What I have found is that this is at its best when paired with a more dewy foundation – I’ve been pairing it often with Clinique Even Better Makeup. Something about this combination gives me the most glowy and perfect looking skin and I am obsessed (expect a post fully dedicated to that foundation in the near future). It smoothes out the skin and diffuses any imperfections and leaves the skin looking like skin.

What this powder is also wonderful for is to set your under-eye area. Sometimes when using a full coverage powder that you used to set your face makeup under the eye it can cake and settle into fine lines. This powder is so finely milled (excuse the cliche blogger phrase) that it diffuses and perfects what ever product is underneath, and is lightweight enough to be ideal for the delicate eyes.


Now the only downside is that this is a very expensive product. I would say that all you oily-skinned gals should probably steer clear of this one, but if you’re into that glowy look then you might want to save your pennies and give this a try. Have you tried any of the Ambient Lighting Powders? 

-RachelElizabeth

Clinique Cheek Pop in Peach Pop | Review

I am extremely late on the bandwagon with this one. The launch for the Clinique Cheek Pops was huge in the beginning of this year, and everyone in the blogging world was talking about them. I waited a while before I decided to pick one up and I’ve been using it a good couple of months and thought now was finally time to get my act together and dedicate a post to this beautiful blush…

The Clinique Cheek Pop in Peach Pop to me leans more towards a pinky-coral than a true peach. The shade really brightens up the face and is quite versatile and would suit a lot of skin tones. It is quite a sheer formula so it doesn’t punch as much colour as it looks like it may in the pan. I personally see this as a plus as I much prefer a buildable blush as opposed to one that is far too pigmented that deposits far too much colour with one dab of the brush. The texture is quite difficult to describe – it feels slightly creamy to the touch but not enough to be a cream blush, but it is nowhere near as dry as a powder. It looks so natural on the skin and as Clinique describe ‘virtually powderless’. 


Cue an incredibly unflattering close up of my face:


I pretty much love everything about this blush. The gorgeous flower design (which won’t disappear for a long time), the colour, the formula, the staying power… I could go on and on. It is definitely very unique, and whether you’re a powder or a cream blush gal, I have a feeling you might like this…

RachelElizabeth

Maybelline Color Drama Lipstick in Red Essential | Review and Swatches

When I was in Boots the other day (are we surprised?) I was browsing the Maybelline products and spotted something I had never seen before tucked away in the lip section. They was nothing to say they were new and I haven’t heard anything about these anywhere, so the blogger in me was very excited about this unknown potential treasure. When I read on the label Intense Velvet Lip Pencil, I instantly thought these may well be a dupe for the Nars Velvet Matte Lip Pencil, which I love (post on Red Square here). I am having a serious matte lip moment, so I had to try one of these out…

The Maybelline Color Drama Lipstick in Red Essential is a deep, slightly cool-toned red. It sits somewhere in the middle of the classic red lip and a deep vampy shade. I was very surprised at the formulation of this lipstick – despite it being incredibly matte, it was very smooth and creamy to apply and feels similar to the Nars offering. It isn’t terribly lightweight on the lips – it definitely feels like you are wearing lipstick – but I wouldn’t say that it is uncomfortable to wear. Although it isn’t hydrating by any means, it was not particularly drying compared to some other matte formulas. I was blown away by the lasting power of this formula; it wore incredibly throughout the day with no signs of awkward fading in the centre of the lips and even held up well through eating and drinking. 


I am over the moon with this unexpected purchase and I couldn’t recommend this lipstick enough! And I haven’t even mentioned the best part… they are an absolute steal at £4.99. I am without a doubt going to pick up some more shades to test out and review as I am completely blown away. Good job Maybelline.

RachelElizabeth