BEST OF | Pink Makeup

Valentine’s Day may be long gone, but there’s no reason to put down our pink-hued makeup just yet. For me, pink screams Spring. There’s something about the colour that adds a freshness, a youthfulness and a brightness to any makeup look. Whether it is a bright pop of fuchsia you’re craving, or the more toned-down rose option, this post will include something for you…


I’ll begin with perhaps the most unapproachable area of makeup when it comes to all things pink – the eyes. I can’t say that I’m a lover of neon fuchsia eyeshadow (although I was known to rock that look many, many years ago) but here I bring you subtle rose-tinted shades that while they add a hint of colour, won’t stretch you too far from the neutral spectrum. The most obvious option is the well-loved Urban Decay Naked 3 Palette, which is a stunning rose-hued neutral palette. I have posted three looks with this palette which you can check out here. If this palette is slightly out of your budget, or if you’re still on the fence about these pink hues, a great affordable alternative comes in the form of the L’Oreal La Paris Nude Palette which delivers many similar shades (full review here). The final stunning pink option (in the top image) is the Mac Pigment in Rose. This is a really interesting mixture of gold and rose, and it is intensely shimmery and metallic. If you’re a neutral lover and you want to add colour to your arsenal, this comes highly recommended.


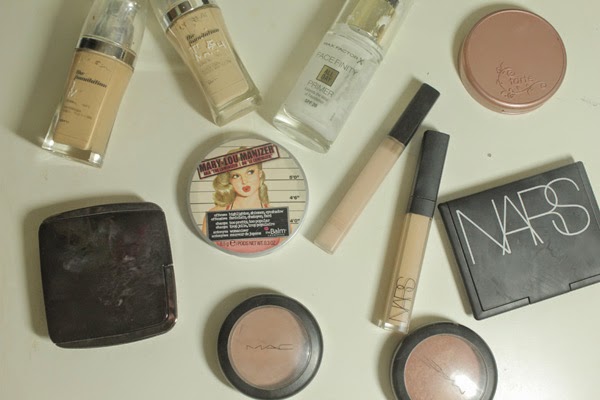
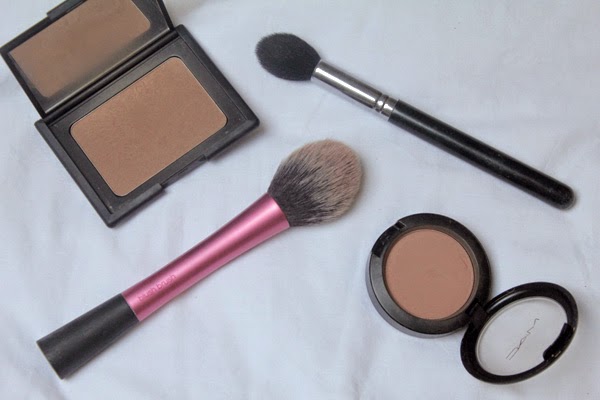
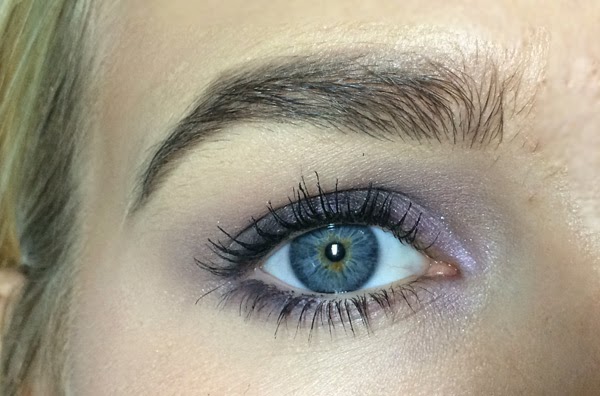
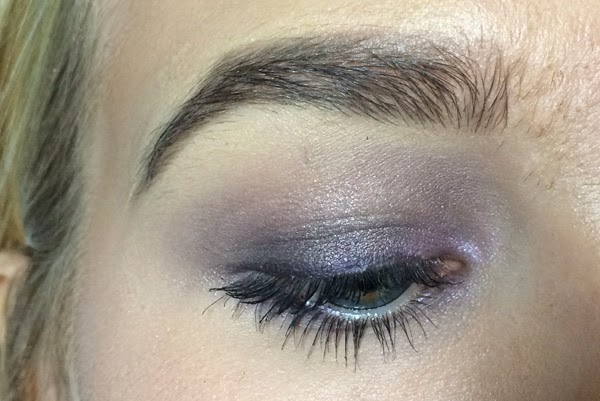
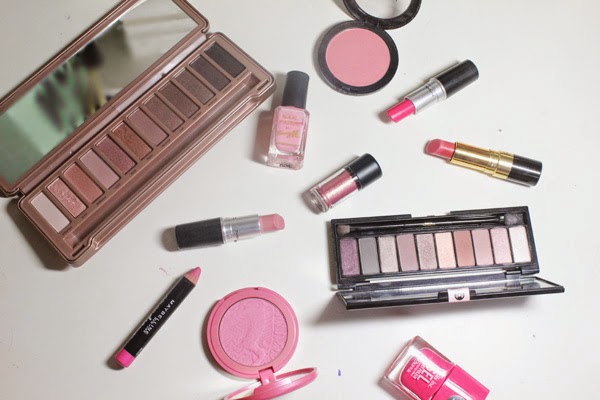
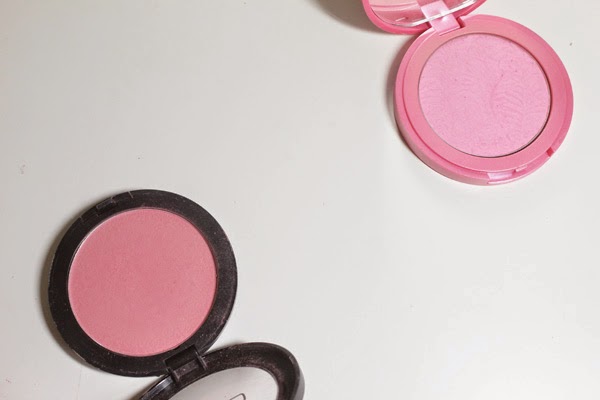
From the hardest feature to the easiest to incorporate pink is the cheeks. A pink blush is the nearest to a natural flush without using a full-on red shade. Finding the right shade of pink can add a gorgeous youthful glow to the skin. The first blush I bring you is from my favourite formula, and it is the Tarte Amazonian Clay Blush in Dollface. These are the most long-lasting and smooth blushes I have ever tried and (apologies to all my non-American readers) you need to try one out ASAP. Ordering from Sephora is achievable these days so it is a little easier to get hold off. This shade is a pop of light pink that isn’t too warm or too cool so it would suit a huge range of skintones. On the more budget-friendly side is the Gosh Blush in Flower Power. This is slightly easier to wear that the bubblegum hues and works great on those with more yellow undertones in the skin. Having said that, I also feel this is a universal shade, and the slight shimmer adds a really pretty, but subtle, sheen to the cheeks.


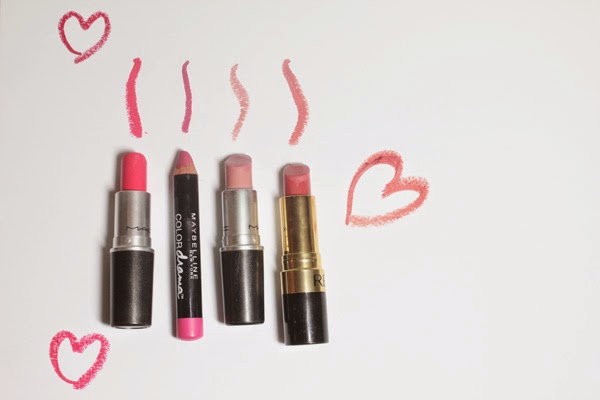
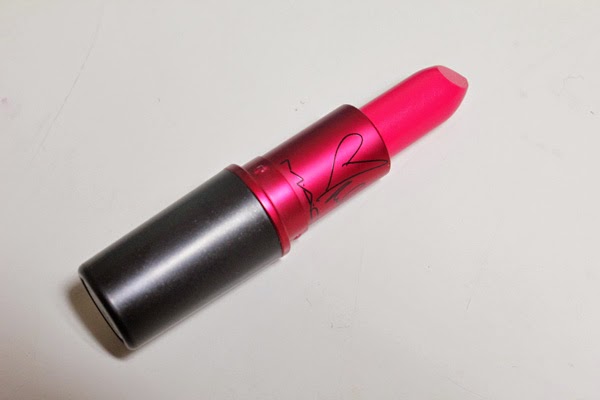
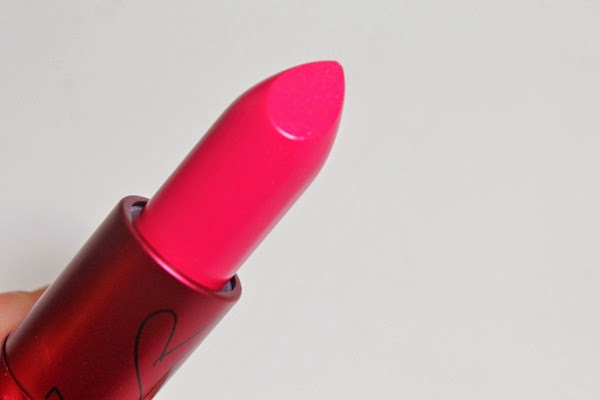
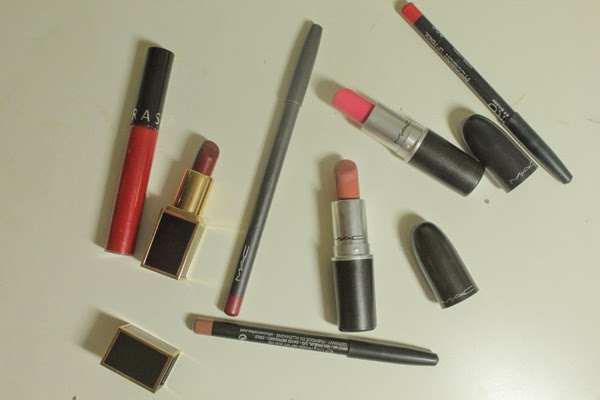
My favourite way to incorporate pink, and my favourite makeup category in general, is definitely lipstick. If you’re like me and love to experiment with your lip colour and wear bold, bright shades, then Mac Lipstick in Impassioned is one of my all-time favourite shades. This colour is probably the shade that suits me the most out of anything I’ve tried, but I can see this working on so many people, fair to dark skin. It is a yellow-toned pink that leans slightly towards red. Stunning. For a slightly more blue hued fuchsia shade, I can’t recommend the Maybelline Color Drama Lip Pencil in Fuschia Desire enough (check out my full review of these here). Moving on to the more parred-down options, for those who love nude-pink shades, Mac Lipstick in Creme Cup will definitely become an instant favourite. The formula is gorgeously creamy and the shade is very flattering. Finally, a favourite everyday shade of mine would have to be Revlon Super Lustrous Lipstick in Pink in the Afternoon. This is a stunning warm-toned mid pink. It adds colour to your lips but it isn’t so much of a statement. This is definitely the one I’d recommend for those who are new to or slightly wary of pink on the lips.


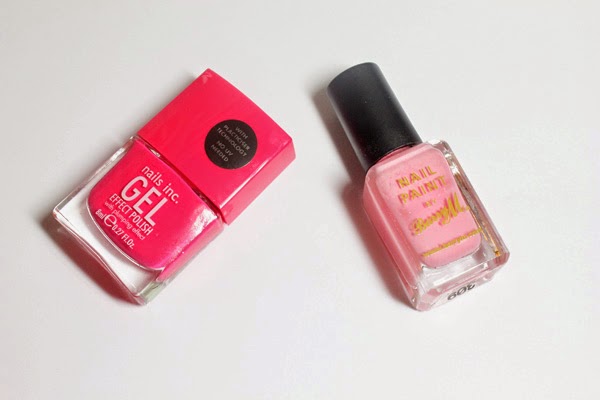
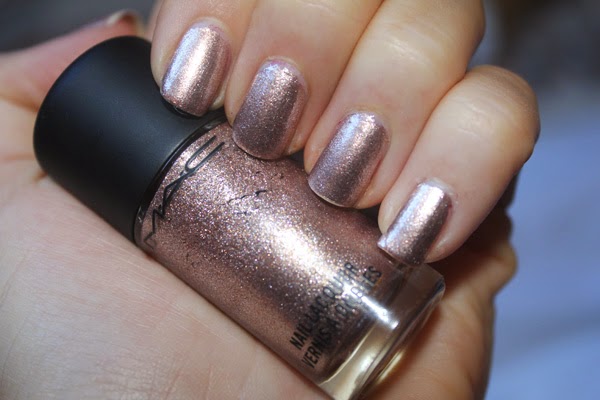
And finally, we finish on nails. For the bright, in-your-face option, this Nails Inc Gel Effect Polish in Covent Garden Place is a fun and intense fuchsia, which i think looks amazing on the toes especially. This Barry M Nail Paint in Strawberry Ice Cream is definitely more everyday appropriate, but still adds enough pink to make it fresh and fun.

So that rounds up my pink-themed makeup picks. It’s funny because I wouldn’t really associate myself as a pink gal, but there’s something about pink makeup that is just really incredible, and it is a universally flattering shade. What are your favourite pink picks?

RachelElizabeth

Mac Viva Glam Miley Cyrus | Review and Lip Swatches

I am the biggest fan of the Mac Viva Glam campaigns. In case you weren’t aware, Mac has a line of lipsticks of which all of the profits made go towards HIV and AIDS programmes. They regularly team up with celebrities and in the past they have included the likes of Rihanna, Nicki Minaj and Lady Gaga to produce limited edition lipsticks to go along with this collection. I have been anticipating the Miley Cyrus collaboration ever since I had heard about it, especially as it promised a bright pink shade, which is right up my street…


Mac Viva Glam Miley Cyrus Lipstick is described as a ‘hot pink’ with an amplified finish. The amplified lipsticks are usually incredibly pigmented and have enough slip that they glide easily onto the lips but aren’t too creamy that they are nice and long lasting. I have to admit when I first swatched this I was a little disappointed with the pigmentation, but it built up opacity in a few swipes. The formula is beautiful; it is very comfortable on the lips and stays around for a good while, and leaves a stain when the sheen has disappeared. 

Let’s just say that the colour is all that I had hoped for and more. When you think of Miley, you think of bold and fun shades and this definitely fits that bill. It has slightly blue undertones so great for making your teeth look whiter, and also perfect for brightening up the face. This shade would work amazingly on fair all the way up to dark skin tones. In terms of dupes in my own collection, I would say that it is fairly similar to Mac Impassioned but that leans a little more red. It is certainly not a unique shade, but if you’re into your hot pinks then this is definitely a good option, especially as it helps such a good cause.

So it’s a huge thumbs up for me for this lipstick – Mac are definitely top for me when it comes to lipsticks. What did you think of this collaboration? 

RachelElizabeth

What’s In My Makeup Bag – New York Edition! | Blogmas Day #14


The time has finally come for my birthday trip to New York! This afternoon I am jetting off to NYC with the boyf to celebrate my 21st birthday! This was actually my present from my parents, and it is possibly the best a girl can ask for. However, I have committed myself to Blogmas, and I really want to keep up with posting everyday, so I actually plan on scheduling enough posts until I return on Thursday! I thought I would start off with what makeup I am planning on taking on my trip, as these are some of my favourite posts to read – everyone loves to be nosey…


I will begin by saying that I am by no means a light packer – I like to have options. Having said that I don’t think that I have gone too overboard; I will leave that one up to you.

Face
Because the days will be long, I definitely wanted to bring a primer. One of my all time favourites is the Max Factor Facefinity All Day Primer (full post here), and as I’ve almost ran out, I thought I would be able to finish it off on the trip. I then decided to bring my tried and true L’Oreal True Match Foundation (review here)- I am bringing two shades (W1 and W4) because I fake tan, and once it fades I need to mix the shades. I am also bringing two concealers: the Nars Radiant Creamy Concealer in Custard for blemishes and general imperfections and the Maybelline Fit Me Concealer in Fair to highlight the face. Moving on to powder products, I am bringing the Hourglass Ambient Lighting Powder in Dim Light (post here) to set my makeup, and the Nars Bronzing Powder in Laguna and the Mac Blush in Harmony for general bronze and contour goodness (check out my recent post for more details on this!). I decided to bring two blushes – my all time favourite Tarte Amazonion Clay Blush in Exposed and Mac Mineralize Blush in Warm Soul. These are quite similar colours, but Exposed is matte and Warm Soul is very shimmery. Finally, I’m bringing my current favourite highlighter theBalm Mary Lou-Manizer (post here).


Eyes
This category is one that I feel I have actually been quite selective. I had to bring my trusty Nars Smudgeproof Eyeshadow Base to keep my eyeshadow looking flawless all day, and I also decided to bring the Estee Lauder Pure Colour Stay On Shadow Paint in Chained for days when I want a quick easy option. I decided to stick to one palette that has everything I need, and this had to be the Lorac Pro Palette – I have a full review and swatches here. This is still quite new to my collection but it is probably my favourite palette, and I know that it will serve me well. Next is the Urban Decay Ink for Eyes liquid eyeliner and for mascara I am bringing the Bourjois Volume 1 Seconde Mascara. And of course I am bringing an essential to my makeup routine – my Tweezerman Eyelash Curlers and my current eyebrow pencil, the Revlon Brow Fantasy in Dark Blonde. As a bit of a glamorous addition to my makeup for my trip I thought I would bring a pack of my favourite eyelashes, the Ardell Demi Wispies.  


Lips
Probably my favourite category, and one that I always struggle to pack for! So I decided to bring the basic choices. For my nude lip option, I have picked the Kiko Precision Lip Pencil in 300 Caffe Latte and the Mac Lipstick in Kinda Sexy. This is one of my favourite go-to combinations at the moment. For a bold red, I chose another Kiko Lip Pencil in 306 Geranium Red and my current obsession, the Sephora Cream Lip Stain in 01 Always Red. In case I’m feeling a bold lip that isn’t red, I decided to bring Mac Impassioned, which is another fave of mine. And finally, the newest lipstick in my collection, Tom Ford Leonardo (full post here) just because it’s stunning. For a lip liner to accompany that, I’m bringing Mac Beet Lip Pencil

Brushes
The final category is tools. For ease, I will list the brushes I am taking, and if you want to know more about my favourites, check out my posts on brushes here. So from left to right we have: the Real Techniques Setting Brush, the Sigma F25 Tapered Face Brush, the Real Techniques Contour Brush, the Real Techniques Multitask Brush, the Sigma E35 Tapered Blending Brush, the Real Techniques Buffing Brush, the Mac 239 Brush, the Real Techniques Blush Brush and the Mac 217 Brush. I know this may seem like a lot of brushes, but it means that I will have everything I could possibly need on my trip.

I apologise for the incredibly wordy post, but I hope that you enjoyed having a nosey in my makeup bag. Stay tuned tomorrow for all the skincare goodies that will be travelling across the Atlantic with me. 

RachelElizabeth

Bronzing vs. Contouring | Differences and My Favourite Products – Blogmas Day #11


In a recent blogger twitter chat, the topic was contouring. It was when a few people expressed confusion over what contouring actually is and how it differs from bronzing. I am not claiming to be a makeup artist, but over the years of watching my fair few YouTube videos and reading blogs, I feel I have a firm grasp on all of this. So today I thought I would discuss in detail how I like to sculpt and warm up my face, and hopefully some of you may find this useful…


So, let’s start with bronzing. The easiest way to think about bronzing is to use it as a way to warm up the skin. I like to out bronzer on the high points of the face – in other words, where the sun would naturally hit. As you hopefully can tell in the picture above, my skin is warmest on the cheeks, temples and forehead. If I’m going for a super bronzed look, then I will hit the bridge of the nose as well. Effectively, this application of bronzer is to mimic a tan, or a sunkissed glow. It also helps to bring colour to the face and keeps it from being one flat colour, which can sometimes look unnatural. It is also handy to bronze down the neck, as for many of us, that is much lighter than the rest of the body. This can help make the transition from your face to your neck look a lot more seamless and, again, natural. My favourite bronzer – one I have mentioned many times and even dedicated a whole blog post to here – is the Nars Bronzing Powder in Laguna. For my skin tone (I go between a NC20 and NC30), this is the perfect colour, but this obviously will be different for everyone. For application, I love the Real Techniques Blush Brush – the tapered end allows for precise application, but the rest of the bristles help to blend it seamlessly. 
Moving on to contouring, this is arguably the most popular trend in makeup right now. There are constant pictures on Instagram of the extreme intense cream contouring a la Kim Kardashian, but today I thought I’d discuss a more wearable version. Contouring is sculpting the face – you create depth and dimension by mimicking shadows and darkening the areas on your face that you wish to recede. The most common place to contour is underneath your cheekbones, which I have done fairly naturally in the picture above. To find where to contour your cheekbones, you can suck in your cheeks to make the typical fish face, or a pretty foolproof method is to imagine a line from the top of your ear to the corner of your mouth. To make this look natural though, I would never bring this colour past the middle of the cheek – if you a imagine a line going straight down from your pupil, you don’t want to have any shadow past that. You can also contour other parts of your face, depending on what suits you and where you would like to sculpt. A popular place is also the nose, but I feel like this is something quite difficult to master and make look natural. If you want a more pouty-looking lip, you can apply a little underneath your bottom lip which will make it look fuller. These are only a few ways to contour, and the possibilities are endless.
Personally, I think the most natural method for contouring is using a powder. When looking for one, you want to find one that is a lot more cool-toned than your bronzer – i.e. it should look considerably more grey in tone. This is because this will look more like a natural shadow rather than an orangey-toned line on your cheek. It is also essential that your powder is matte, as any shimmer will bring attention to the area, when the key is to make it recede and draw attention to the highlighted or non-contoured parts of the face. My go-to contour product is the Mac Harmony Blush, and I would see this being perfect for fair to medium skin tones. My favourite brush for contouring is the Sigma F35 Tapered Highlighter Brush – it is tapered enough that it only applies a small concentrated amount of product, but much like the Real Techniques brush, the outer bristles help to blend everything out. 
I hope this rather wordy post has been somewhat useful to you, and if I haven’t explained myself very clearly then please let me know! It’s important to remember that the key to contouring, like any aspect of makeup, is practice. Nobody gets it perfect on their first try, and part of the fun of makeup is experimenting and finding what’s best for you. Do you love contouring and bronzing as much as me? 
RachelElizabeth

Makeup for Photography | Blogmas Day #10


With the festive season well and truly underway, it’s likely that many of you will be invited to more events than usual. Whether they’re nights out, christmas parties, or general reunions, you will probably encounter some sort of camera, and when you put so much effort into your makeup when getting ready, you want to make sure you’re camera ready. I’ll admit I’m not often photographed, but after many club nights and their ‘professional’ photos, I’ve picked up a few key tips that I thought I would share with you…

Avoid SPF
It’s a well-known fact in the beauty world that the ingredients that make up sun protection (zinc oxide and titanium dioxide to be exact) can cause flashback in photography. Have you ever looked back at pictures of yourself and though that your face looked extremely pale and ghostly compared to your face? This could be the reason. You need to check all products you use – moisturiser, primer, foundation and powder should ideally be sans-SPF. Having said this, some products with SPF that I own photograph beautifully (L’Oreal True Match being one of those), but if you’ve never tested them, it’s safer to err on the side of caution. My favourite foundation for photography is by far the Giorgio Armani Luminous Silk Foundation – I am wearing it in both the pictures above, and – if I do say so myself – I think it captures the light beautifully, leaving my skin looking glowy and healthy. 
Contour, Contour, Contour
Features can definitely get lost in photos, so I definitely make sure to bring back colour and definition to my face. I am planning on doing a post all on contouring soon, but to keep things short and simple, I use Mac Harmony Blush with a Sigma F35 Tapered Highlighter Brush to sculpt out my cheekbones and temples. I also find it important to bring back some warmth and colour to my skin, so to the high points of my face (i.e. where the sun would naturally hit) I apply bronzer – usually Nars Bronzing Powder in Laguna. I also always apply blush, as you can sometimes look a little washed out and lost in photos. All these steps are done with a much heavier hand than I would ever do in the daytime in order for them to even show up in pictures. This also means you have to spend a little longer blending everything out, and I like to just go back over everything with the brush I used for my foundation.
Define those Eyes
You don’t necessarily need to be the master of smokey eyes to look great in pictures. I think the most important element of your eye makeup is defining the upper lash line. I personally love to line my eyes with a gel liner – something like the Mac Blacktrack Fluidline. It is equally important to tight line – this is lining the inside of the eye. I find this a little unflattering on the lower waterline, but doing it on the upper really helps to darken the lash line and create drama. Lashes are also a must for me; they make your eyes stand out and really pop in photos. My ultimate favourites for my eye shade are the Ardell Demi Wispies. My final tip is to give some love to your eyebrows. I tend to go in much heaver with my brow pencil, my favourite being the Anastasia Beverley Hills Brow Wiz in Taupe. As you can see from the pictures I still don’t go over the top, but they are lot more defined than I would go for an everyday look. 
Hopefully this post has been somewhat useful or interesting and I hope that you can use some of these tips when you’re next being photographed! I am by no means claiming to be an expert, and I am completely self taught. Have you got any tips for makeup for photography?
RachelElizabeth

Manicure Monday #26 | Mac Nail Lacquer in Soiree – Blogmas Day #8

When you think of Mac, nail polish is not the first thing that springs to mind. They have quite a bad reputation in the YouTube and Blogging worlds – they’re known for being quite expensive for something that is not that great. Now I believe it was the Cham-Pale collection from a good few years ago now, and I was checking out all the products on Temptalia (as always) when I saw this gorgeous shimmery light rose gold-esque shade and I knew it had to be mine…


Mac Soiree is described as a ‘sparkly light bronze gold’ and luckily for you and me it is now part of the permanent collection. This has to be one of my favourite nail polishes in my collection. It is incredibly easy to work with; it applies opaquely with one coat and never, ever goes streaky. The pigmentation on this is amazing, and its a go to polish for me when I haven’t got much time as it looks perfect without any effort. Let’s not forget that the colour on this is also spot-on for this time of year – it’s sparkly and fun, but not over the top.

RachelElizabeth

Mac Keepsakes / Plum Eye Bag | Review, Swatches and Eye Look! Blogmas Day #4


I have to admit, I don’t usually pay much attention to the Mac Christmas collections. They come out with so many collections these days and I’m just not as into following them as I used to be. That being said, I was very pleased and excited to receive one of the eye kits for my birthday from some lovely friends as I hadn’t tried any of the products that came with it…
The Mac Keepsakes / Plum Eye Bag contains three eye products: an Extra Dimension eyeshadow duo in the shades Triple Impact and Round Midnight, a powerpoint eye pencil in the shade Permaplum, an In Extreme Dimension Lash mascara and they all come in an amazing limited edition glittery black makeup bag. Only the eyeshadows from this set are limited edition, so the eyeliner and the mascara are available to purchase all year round. 
I’ve always been intrigued by the Extra Dimension eyeshadows that Mac often bring out with collections. They always contain this stunning raised swirl pattern, and the formula is very unique. It feels somewhere between a cream and a powder – it feels much creamier and smoother to touch that a standard powder eyeshadow but it isn’t actually a cream product. Triple Impact is described as an ‘Opalescent Pink’ – it has a pale pink base and with a blue-purple duochrome running through it, so it looks different colours when it catches the light. Round Midnight is described as a ‘Rich Reddish Plum’ – to me it is a blackened purply-plum shade, that also catches the light beautifully. These are both metallic and shimmery eyeshadows, so if you’re not a fan of sheeny glittery lids then these may not be for you. They are both nicely pigmented, although I would say Round Midnight is more so, and it is definitely my favourite of the two.
I’ve actually never tried an eye pencil from Mac, let alone a Powerpoint Pencil, so I was very intrigued about this one. Permaplum is described as a ‘Deeply Plum with Dark Shimmer’, but to me it is a blackened very blue-toned purple and has a soft sheen to it, rather than any noticeable shimmer or glitter. It is an incredibly creamy formula, which is easy to smudge out to create soft smokey looks. It does set, but it does give you a lot of time to work with. For me this seems like a pencil you use on the lashlines rather than the waterline. 
Much like eye pencils, I have never delved into the world of Mac mascaras as they often don’t get high appraisal in the blogging and YouTube worlds. The In Extreme Dimension Lash is supposed to be largely a volumising formula, which I would definitely agree with. I didn’t get a whole lot of length with this, and I found it a little messy to use as initially it is a very wet formula. The wand reminds me very much of the Benefit They’re Real Mascara as it’s a plastic wand with short bristles and has the extra bristles on the tip of the wand to aid lower lashes and inner corners etc. I don’t think I’ve quite made my mind up on this one, as I feel that if may get better once it has dried up a little. Right now I think it’s okay; it’s not my favourite.
Below I’ve included pictures of all the products used on my eyes. I used Round Midnight all over the lids and Triple Impact  on the inner corner. I blended a little of Mauve from the Lorac Pro Palette (full post here) into the crease and along the lower lashline. for some added definition and to ground the look. I lined the upper lashline and the outer half of the lower lashline with Permaplum and finished off the look with the In Extreme Dimension Lash.  

All in all, I think this definitely a set worth buying if you (or someone you are buying a gift for) love purple-toned eye makeup or is looking to experiment with colour. It’s also a great way to try a few new Mac products for much better value. I definitely give this gift set a thumbs up. What are your thoughts on this year’s Mac Christmas collection?

RachelElizabeth

FOTD | Halloween Edition – Pop Art


I know Halloween has been and gone, but I still thought it would be fun to share with you what I wore. I had a lot of fun creating this pop art inspired look, and although it took me a long time, I definitely think that the end result was worth it. If you’re interested in how I did this look, keep reading…


I started with my standard foundation routine – the Hourglass Veil Mineral Primer to ensure extra longevity, my L’Oreal True Match in W4 followed by the Nars Radiant Creamy Concealer in Custard under my eyes and on any blemishes. I then set this all in place with the Mac Mineralize Skinfinish Natural in Medium Plus

Now onto the fun part. I primed the eyes using my standard Nars Smudgeproof Pro Prime Eyeshadow Primer. I then used the hot pink out of the Urban Decay 15th Anniversary Palette (no longer available but any pink would work) all over my eye lid, and created a winged out effect using an angled brush. I then lined my eyes using the Mac Blacktrack Fluidline and extended the line to reach where I had winged the eyeshadow to. With the same liner, I outlined the shape of the eyeshadow, to create a slight cut crease look, and connected it to the inner corner. I lined the waterline with the Nyx Jumbo Eyeshadow Pencil in Milk to create a bright eyed cartoon effect, then lined under the lashline with the fluidline. Next up was the eyebrows. I started by creating the basic shape with a black eyeliner and then went back over that with the fluidline to make sure it was really dark. I created the expression marks in the crease and in between the eyebrows by making a sad expression and following my natural lines. 

The tear was pretty simple – I drew the basic shape with a bright blue eyeliner pencil and then set it in place with a corresponding eyeshadow. I then lined that again with the fluidline. Next up was the lips – I started by lining and filling in my lips with my trusty Kiko Precision Lip Pencil in 306 and topped it with the Bourjois Rouge Edition Velvet in Hot Pepper to create a vibrant and long lasting lip shade. I then lined the lips with the fluidline. Next up was the dots – the part I was worried about the most. I used my favourite Maybelline Color Drama Intense Velvet Lip Pencil in Red Essential as the tip was a bit thicker than a regular pencil which actually made drawing on the dots quite easy. They may not have been the neatest – I struggled on my cheeks where my skin was slightly more squidgy – but I think it worked for the overall effect. The finishing touches were to line the perimeter of my face with the gel liner and then spray my hair yellow with coloured hairspray (link here).

So I hope you enjoyed this post. If you were interested in what outfit I wore, it was an aztec style dress from Missguided – but I think any bright dress could have worked for this look. What did you go as for halloween? 

FOTD | Makeup For Glasses

I’m not entirely sure why I’ve never spoken about or worn my glasses on my blog before, but I actually have to wear them everyday in real life. I also have contacts, but I’ve never found them comfortable enough to wear daily, and in all honesty, I actually quite like wearing glasses. The only thing that I find annoying is that makeup ultimately gets swallowed up by the frames, and there are also several factors that I have to consider when adapting my makeup for glasses.

So, my frames are Tom Ford (link here) and they are relatively new. On me I prefer a bigger frame, just because I feel it suits my round face shape. I really like the slight cat eye that these glasses have and I always go for tortoise shell frames as they are less harsh against my light features than black. However looking at them from a distance they practically look black meaning that they go with everything.

The main concept I’m going to focus on in this post is definition. Especially with big frames like mine, your face can get pretty lost and end up looking quite flat. I find it hugely important to pay extra attention to the brows – the key here is for them to look groomed, defined but not so intense that they compete with the frames. Today I used the Anastasia Brow Wiz in Taupe (full review here). I think it is also important to focusing on defining the lash line, especially when you have light-coloured eyes like me. I always go for a wing, and my favourite eyeliner of the moment is the Urban Decay Ink For Eyes (full post here). Finally, as cliche it may be when it comes to makeup looks for glasses, I love to rock a bold lip as it really balances out the face. Today I was feeling quite autumnal, so I lined my lips with Mac Beet Lip Pencil and then applied the Yves Saint Laurent Rouge Pur Couture in 60 Antifashion over the top. I love this lip combo as while it is still a berry, it still brings a lot of light and colour to the face.

I don’t believe that there should be any rules or restrictions you have to abide to when it comes to makeup, but sometimes, especially when you’re in a rush, it is nice to have a go-to look to fall back on. Glasses are a great accessory in themselves, so it often means you don’t have to wear as much makeup to make a statement. Do you wear glasses? What are your tips and tricks? 

RachelElizabeth

Eye Brushes | My Favourites

Today I bring you part two of my brush series. In case you missed it, yesterdays post rounded up my favourite face brushes (read it here). Now its only fair that we dedicate a post to eye brushes. The line up again consists of brushes from Sigma and Real Techniques but today we have a couple of Mac thrown in there…

Beginning with Sigma, my first favourite is the E30 Pencil Brush. This I primarily use for applying shadow on the lower lash line or smoking and smudging out eye liner. This is an absolute essential for any smokey eye.

The next three brushes are essential for blending. The Sigma E25 Blending Brush is a godsend when it comes to applying colour to the crease of the eye. If you don’t have a brush like this you need one asap. Something about the slightly tapered shape and the texture just does the work for you, and you will be a blending pro in seconds. The Sigma E35 Tapered Blending Brush is the E25’s slightly fluffier counterpart. I use this with no extra product on the brush and blend out the edges of an eye look. The final blending brush is the infamous Mac 217. This is practically identical to the E25, but I find it definitely comes in handy having more than one blending brush on hand – especially when more elaborate eye looks come into play.

Possibly my favourite eye brush is the Mac 239. This is perfect for packing on shadows on to the lid as it deposits the right amount of shadow. This is great for both pressed and loose shadows, and I am just in love. I personally think this is a Mac brush worth investing in as it works better than any other flat shader brush I’ve tried, including the Sigma.

Finally, we have the Real Techniques Fine Liner Brush. This has fast become my favourite brush to use with gel liner, because, as the name would suggest, the tip is incredibly fine. It makes it so easier to create thin precise line, but it is still easy to build up the thickness and intensity. It also cleans really easily which is ideal as gel liner can be quite stubborn on brushes. 

Thankfully this post was far more concise than yesterdays, and I hope that you found this mini series somewhat useful or interesting! What are your go-to brushes?

RachelElizabeth