Sleek Eyebrow Stylist | Review


I’m not one to try too many brow products – I’ve found one I like (Mac Eye Brows in Fling if you’re wondering) and I have consistently repurchased. This may come as a surprise as I am quite fickle when it comes to other makeup categories… However, when there is a lot of hype around a product, I do become a little intrigued, and normally it’s not too long before it’s in my basket and coming home with me.

The Sleek Eyebrow Stylist (£5.99) comes in three shades. Having blonde hair, I picked up the shade light. My eyebrows are quite dark, but I tend to pick lighter shades so that they don’t look too stark against my hair or skin. This pencil is quite a sheer formula, which I quite like in a brow pencil – it makes it much harder to go overboard. It’s also quite a hard pencil, which is great if you want a more natural look, and will last longer than a creamier formula as you won’t use as much product. In terms of the shade, it matches perfectly with my brows – it isn’t too warm and orangey or too cool and grey. It sits in the middle, creating a natural looking shade. The pencil is quite thick, which makes it hard to create individual brush strokes, but if you only need to fill in sparse areas, this isn’t an issue. It also has really good lasting power.

The addition of the spoolie is one of the best aspects of this product. A lot of brow products are including them now, and I think that they all should. Brushing the brows up before applying the pencil allows you to shape your brows, and then brushing them through after application makes them look much more natural.

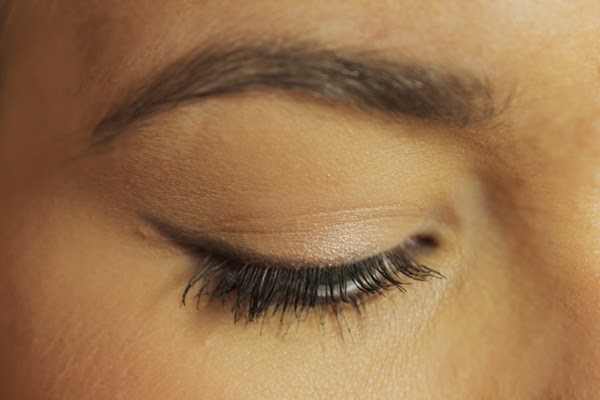
Below is a before and after of my brows:


As you can see, I have pretty full brows, but they are a little bit sparse, particularly at the front. This brow product is great for natural looking brows, and I would say great for those who haven’t tried brow products before. It’s pretty foolproof, and almost impossible to have a heavy hand. I really like this brow pencil – I don’t know if it has quite overtaken my love for the Mac offering, but it is definitely a close one. 

RachelElizabeth

Inside My Sister’s Makeup Bag

Introducing to RachelElizabeth, fellow beauty addict and my older sister Charli. We both started watching YouTube at around the same time (a long long time ago), and she, much like myself, has a rather large beauty stash. I’ve wanted to include her on the blog for a while, and as she often travels back home to visit I thought there was no better introduction than having a nose in her makeup bag. She is a Physiotherapist, so I asked her if she could explain the makeup that she wears on an everyday basis, and, of course, the fun things she adds to spruce it up on the weekends.


Working in a hospital means I don’t get the chance to top up my makeup throughout the day, and as I have oily skin I like to use products that keep me as matte as possible. On a daily basis, I start by prepping the skin – firstly, I use the Urban Decay De-Slick Makeup Setting Spray and then prime with the Rimmel Stay Matte Primer. I find the combination of these products has been the best base to apply makeup on top of. For foundation, I use the Mac Studio Fix Fluid in NC15, followed by concealing under the eyes and any blemishes with the Mac Pro Longwear Concealer also in NC15. This concealer is the only concealer I have tried that doesn’t crease under my eyes, and it stays put on my skin even at its oiliest. To set this all in place and to add a bit more coverage, I use the Mac Studio Fix Powder, again in NC15. To bring a bit of colour and subtle contouring to the face, I switch between the Body Shop Honey Bronze Bronzing Powder in Shade 03 and Nars Bronzing Powder in Laguna (not pictured above). My favourite everyday blush is the Tarte Amazonian Clay Blush in Exposed as I find it is natural enough for daytime when used with a light hand. To fill in my brows, I use the MUA Pro-Brow Ultimate Eyebrow Kit – the medium brown (top right) is the perfect shade for my brows. I used to use Mac Eyeshadow in Omega but I find the MUA option much more pigmented. I then set my brows with the Maybelline Brow Drama Sculpting Brow Mascara in Dark Blond. Finally, I curl my lashes and apply mascara. I use two different ones because most mascaras smudge on my lower lash line. My favourites are the Chanel Volume De Chanel Mascara for my upper lashes and the Clinique Bottom Lash Mascara as it doesn’t smudge or transfer throughout the day. As a final step, I like to use the setting spray once more, just to lock in all the makeup.


“When I’m not working, I like to add a little more excitement to my makeup. In terms of eyeshadow, I like a light shimmery colour on the lids. For this, one of my favourite combinations is the Make Up For Ever Aqua Cream in Shade 13 as a base and the Bare Minerals Nude Beach Eyeshadow. For a little definition, I like to take the bronzer I’ve used that day and blend into the crease of my eye. All three naked palettes are also my go-to eyeshadows. I love winged eye liner and for this I like the Bourjois Liner Pinceau Liquid Eyeliner – it is a nice matte black shade and it doesn’t transfer onto your brow bone. I also like to brighten my waterline with the Mac Chromographic Pencil in NC15/NW20. One of my favourite steps is highlighter, and for this I use the Chanel Poudre Signee De Chanel Illuminating Powder which I think was limited edition, but I love it because it has a very fine golden shimmer running throughout. For a more natural lip, my favourite is the Mac Lipglass in Nymphette as my all time favourite shade in lip gloss is pink with gold shimmer. For a brighter lip for spring and summer, I recently bought the Mac Lipstick in Full Fuchsia. This is great as it is not too matte but not too glossy, it wears really nicely and isn’t too drying.”

RachelElizabeth


Manicure Monday #15 | Tanya Burr Penguin Chic

Tanya Burr’s lipgloss and nail polish line launched in store in Superdrug last week, and I had to pick some up (check out yesterday’s post here for a review of the lip glosses). It’s so exciting to see YouTubers and bloggers popping up in the shops – they’re becoming such an integral part of the beauty industry and I’m all for it.

Unfortunately, the Superdrug I went in wasn’t fully stocked, but the one that caught my eye was Penguin Chic. It’s a gorgeous taupe, and great for those who don’t love wearing bright colours on the nails or don’t want their nails clashing with their outfit. In terms of the formula, I was pleasantly surprised. It was smooth, and applied opaquely in two coats. I also really like the brush – It is standard, and on the thinner side, but I found it really easy to paint my nails with.


If I had to choose, I would say the nail polishes are my favourite of the line. This may well be because I am a nail polish addict, but I think that these are really well formulated, and there is a nice colour range. At £5.99, these are very reasonably priced, and I would definitely recommend picking one (or several) up if you are in the market for some new nail polishes. They are available in store in Superdrug and online at FeelUnique. I know that I will probably end up with a few more in my basket…

Tanya Burr Lip Gloss Review & Swatches | Just Peachy & Picnic in the Park

It’s always exciting when YouTubers or bloggers are able to further their career outside of their channel or blog. Blogging is really a force to be reckoned with in the beauty industry, and it shows the influence that all the big bloggers have over the mainstream customers. Unless you’ve been living under a rock, you’ve probably heard that Tanya Burr has released her own lip glosses and nail polishes. I was a little wary at first, as they were only available online, but once they were released in stores in Superdrug, I definitely had to pick some up.

The lip glosses retail for an affordable £6.99, and for those outside of the UK can be purchased here on Feelunique. I’m not normally a lip gloss gal, so when looking through the shades, I decided to go for some lighter shades that were more appropriate for everyday wear. The first shade I picked up was Just Peachy. I will warn you that this is a very light shade, and worn on its own (swatched below) it is almost too light for me. It is slightly milky and slightly accentuated any imperfections in my lips, so you will need to exfoliate and hydrate before using this one. However, when using this over lipstick, it works great at toning down and lightening shades, so is perfect to pair over shades that are maybe a touch too dark for your skin tone. 


The second shade, and probably my favourite out of the two, is Picnic in the Park. This is a pretty mid-tone pink shade, that I found really brightened up the face. It has a similar milky texture as Just Peachy but it applied much more smoothly onto the lips. Both shades have a nice amount of shine, and are sticky in formula but nothing too overbearing. I find that stickier lip glosses tend to hang around longer on the lips, and these glosses lasted a good few hours before fading. 

Just Peachy


Picnic in the Park


I’m not completely blown away by these, but they are decent glosses. I am all for supporting any bloggers or YouTubers, and I think Tanya has done a pretty good job here. Stay tuned for tomorrow’s Manicure Monday for a post on one of the nail polishes in the range. Have you tried any of Tanya Burr’s products?

RachelElizabeth

Mac Peach Blossom & Back to Mac Explained

Mac is by far my go-to brand for lipsticks. Their amazing range of colours and finishes means that there is something for everyone, from the most daring to the natural-beauty lovers (check out my favourites here). In case you weren’t aware, Mac offer a scheme called ‘Back to Mac’ which allows you to give back old and finished items in exchange for a lipstick. Over the years I have managed this many times, and is a great way to recycle and to try out new shades.

So what is Back to Mac? 

Back to Mac is a program that encourages recycling of Mac products. Once you finish up 6 products in their primary packaging, you can take them into your local store or counter and exchange them for a free lipstick of your choice (I think some stores also offer an eyeshadow or lipgloss). Think of it like a coffee shop loyalty card…

Recently I finished 6 products (4 brow pencils, brush cleanser and a studio fix concealer, to be exact) and I took them all to a mac store and exchanged them for Peach Blossom. Mac describes this shades as a ‘frosty cool nude’, which I don’t feel is a fitting description. For me this is a natural light peachy-pink shade, perfect for everyday. It has a cremesheen finish, but unlike others that I own, it has a lot less pigmentation. It still has the same creamy consistency, and glides along the lips, but it is quite sheer. For me, this makes it even more wearable as it’s a low maintenance lipstick that isn’t going to take too much trouble topping up throughout the day. Although I have many lipsticks, missing from my collection was the perfect every day shade, and I think this may have just filled that void. This would also be a great one to pair with smokey or heavy eye make up to keep everything balanced. 


So the next time you go to throw away your Mac foundation, think twice. Holding on to your products can feel a little crazy like you’re hoarding rubbish, but the free lipstick is 100% worth it. What’s the next lipstick on your wish list?

RachelElizabeth

Manicure Monday #14 | Barry M Berry Ice Cream

I’m not one for being too girly, but there’s something about pastels (regardless of the shade) that I gravitate towards at this time of year. I love the look of fresh, soft and feminine nails during the transition to spring – injecting colour into my wardrobe is never a bad thing, either…

Barry M Nail Paint in Berry Ice Cream (Boots list this as Ice Cream Purple)


The ice cream collection was a massive hit for Barry M a couple of years ago, consisting of pretty pastel shades, perfect for the spring and summer months. Berry Ice Cream is a perfect pastel lilac shade, which I find looks pretty fun and girly on the nails, but still looking more sophisticated than a barbie pink. As I have mentioned many times before, I love Barry M nail products. They are one of the most popular nail brands in the UK and also one of the cheapest, making them extremely accessible. The formula is great – it is not too thin nor too gloopy, and provides a shiny opaque finish in two coats. I find that all Barry M nail paints last well on my nails, not chipping for about 4/5 days.

Are you loving pastel nail colours as much as I am? Every time I paint my nails I can’t wait to put another fun colourful colour on!

RachelElizabeth


Real Techniques Miracle Complexion Sponge | Review

I have never been one for makeup sponges – I have always associated them with the cheap sponges that come with high street powders that I used to use and how dirty they would always become. Surprisingly, I was never sucked in by the Beauty Blender. I’ve always opted for brushes, and honestly the price has always put me off. But when my favourite affordable brush band (and one of my favourite YouTubers Pixiwoo) comes out with an alternative that everybody is obsessing over, that is definitely coming home with me. 

Real Techniques Miracle Complexion Sponge

My primary use for this sponge is for liquid foundation. When using it damp, it provides a flawless-looking coverage that isn’t too sheer or too full coverage. In terms of comparing it to other forms of application, it sits somewhere in between using your fingers and a brush (fingers being the sheerer option and the brush building to a more opaque coverage). I find that it works well for most formulas of foundation, except those that are water-based (e.g. Mac Face and Body) because the sponge tends to soak up more of the product. I like to use this when I don’t want too heavy coverage and have a bit more time on my hands – I find that this method takes far longer than any other application method.

The shape (similar to the Beauty Blender) is oval, one side being rounded, the other half flat and a pointed tip. The rounded side is the one I use for the majority of my face. I like to dip the damp sponge into some foundation on the back of my hand, and use a stippling/rolling motion across the face. The flat edge of the sponge is really good for getting the foundation in those tricky to reach areas such as the contours of the nose and underneath the eyes. 

However, it doesn’t just stop at foundation. If you like to use concealer to highlight under your eyes and on the high points of your face, this is great at blending it seamlessly into your foundation. Same goes with any other cream products – blush, bronzer, highlighter etc. Another tip is that if you go a little overboard with blush or bronzer, then simply tap this over and it will sheer it out. 

So am I now a sponge convert? I’m not so sure, as I love applying my makeup with brushes. But this is a really nice method for applying foundation. One con for me personally is that I have to clean it after every use because I’m a bit of a germ freak when it comes to face brushes. Whereas I can spot clean my brushes with a bit of Mac Brush Cleanser, for this I have to really work at it with baby shampoo, which admittedly I often forget to do meaning I end up choosing another method. However when I do clean it, I really enjoy using it. It’s really affordable so I would definitely recommend picking it up.

If my explanation didn’t quite cut it for you, check out Sam’s video explaining all its uses and applying it on camera here.

-RachelElizabeth

Hourglass Immaculate Liquid Powder Foundation Review

Hourglass always have products that I’m pining for – their releases send the blogging world into a frenzy and it seems like everyone and their mother is loving something from them right now. I’ll say this as a warning: this is an expensive brand, especially here in the UK. But the products that I have tried are incredible. Today I bring you one of their foundations – oily girls, listen up…

Hourglass Immaculate Liquid Powder Foundation


Claims:
Consider Immaculate the miracle foundation for oily skin. This breakthrough liquid to powder formula absorbs oil, camouflages imperfections, and delivers a long-lasting velvet matte finish—without the need for touch-ups. In a consumer study, Immaculate’s advanced formula was shown to target oily, acne-prone skin. 

Side note – the claims list is quite lengthy on the Hourglass website. Read more about what the brand has to say about this foundation here.

Verdict
First off, this is an absolute godsend for oily skin. I have struggled with foundations staying on my skin for years and this is by far the best I have found. What I like a lot about this foundation is that it isn’t too thick or too full coverage like many of the foundations targeting oily skin (Estee Lauder Double Wear or Revlon Colorstay for example). It provides a medium coverage and is surprisingly buildable – when I first tried it I expected it to start looking cakey but somehow it doesn’t. The lasting power is pretty impressive – I can easily expect this to last a full day without touching up, but as with all foundations I find it performs better with the usual precautions: primer, powder, setting spray etc. It has a slightly mousse-like texture and dries to a powder finish. It contains no SPF, meaning it will have no flashback in photography. I found that in flash photography it looks great, so would be great for a night out. 

In terms of packaging, it is just what you would expect from a product from Hourglass; the signature gunmetal in the lid and the gorgeous slightly shimmery silver bottle. The pump is great – it dispenses a nice amount of product and keeps it sanitary which is ideal for a foundation targeted towards acne-prone skin. 

However, there are some negative aspects of this foundation that I need to address. Little does not go a long way with this product. I find myself having to use multiple pumps to cover my entire face and with such an expensive product like this that is a little bit worrying. It comes with the standard amount of foundation (30ml/1 fl.oz) so you aren’t getting much product for your money. You should definitely steer away from this if you have dry skin – it isn’t as bad as some foundations on highlighting dry patches but it isn’t going to do them any favours. 

In terms of the skin benefits that the website claim it to have, I can’t comment. I bought this in my natural skin tone, and I only use this in between self tanning. It is interesting though that many women have claimed that their skin improved in terms of oiliness, blemishes and texture after using this foundation for 4 weeks – I can definitely say that I have not had any adverse reactions and it hasn’t broken me out. 


All in all, if you have oily skin and you really struggle finding a foundation that will wear well on you, I would highly recommend saving up and giving this a go. If you live near an hourglass counter, or the next time you go in, definitely ask for a sample as it is an extremely pricey purchase. Next on my hourglass wish list are the ambient lighting blushes – how have I not purchased any yet??

RachelElizabeth

Manicure Monday #13 | Essie Blanc

White nails are definitely a love-hate thing. Often deemed as ‘tipex nails’, this trend tends to surface a lot during the warmer months, and some (including myself) see it as a fresh, clean look to the nails. I spilt the last white nail polish I had, so last summer when I was looking for a replacement, I instantly looked at the Essie stand – a brand that I often see as a reliable source for colours that are missing from my collection.

Essie Blanc is a completely pure white shade. I find that paler colours can be troublesome with their formula, and I tend to pay closer attention to their opacity than the brighter or darker shades. This one held up pretty close to my expectations, although I did end up putting on three coats for complete opacity. I think at two coats it would be enough for some, but I needed that tiny bit more colour. As all Essie polishes are concerned, it applied very smoothly and easily with its wide brush. Also like the other shades, the longevity is on point, and will last on my nails for a good while before chipping.


So unfortunately, I could not bring you the perfect white polish today, although this one does come close. If you are looking for a white polish, either for french manicures or all over colour like this post, then this is a good one to go for. Do you know of the perfect white shade?

RachelElizabeth

Everyday Makeup Look | Soft Winged Eye Liner

I have loved winged eyeliner for years – I find it’s really flattering on my eye shape (and on many eye shapes for that) and shapes the eyes to have a more feline effect. I am normally one for bold black liner, but recently I’ve been finding myself wanting to create softer looks, especially when wearing bold lips. Today I bring you a look I’ve been wearing quite a lot recently – a soft brown wing that still elongates the eyes, but in a much softer and more subtle way.


Instead of a pencil or a gel, I have been reaching for eye shadows to create this look. My favourite option has been the Inglot Matte Eyeshadow Shade 327. It is a warm medium dark brown, and I find it really brings out the blue in my eyes. If you have brown or green eyes, a purple-hued shade would work well to make your eye colour pop. I apply it with the Sigma E65 Small Angle Brush starting by tracing the wing on the outer corner. I then drag the brush down  from the wing and line my eyes to about the middle of my eye. I find that this creates a more subtle look, and by not bringing the shadow into the inner corner of the eye, it makes them appear wider. 


Although very simple, this is becoming one of my favourite natural make up looks as it provides definition without being too obvious. This would also work great with coloured eyeshadow as it would create a fun pop of colour, but not in an obnoxious way.

RachelElizabeth