A Cream Deodorant? | Kiehls Superbly Efficient Anti-Perspirant & Deodorant Cream Review

I admit, deodorant is a bit of a boring subject, and if I didn’t love this one so much I would definitely not be writing a post on it! I haven’t had the best of luck with the bog-standard deodorants, so I decided to do some research. This one kept popping up, and I was getting pretty desperate, so in my basket it went…

Kiehls Superbly Efficient Anti-Perspirant and Deodorant Cream

The Claims:
Superbly Efficient Anti-Perspirant & Deodorant Cream with Orange, Lemon and Linseed Extract. Our anti-perspirant and deodorant cream is extremely gentle, yet highly efficient. Leaves skin feeling soft, soothed and conditioned with 24-hour protection against sweat and odour.

The Verdict:
A cream deodorant does seem quite bizarre on first glance, and it was still equally strange applying it for the first time. It feels quite unnatural putting a cream on your armpits… It doesn’t have a very strong smell, it just smells very clean. In terms of anti-perspirant qualities it absolutely delivers – this works better than any other deodorant I’ve tried in terms of stopping odour and sweat. Unfortunately it didn’t keep me sweat-free during a gym sesh, but that was to be expected. I have noticed that my underarms are more moisturised and that it creates a much smother shave.


A short but sweet review for this one, I’m afraid. There’s not much more to say that I think it’s really great. If you’re willing to dish out a bit more for a deodorant then this is definitely one to try.

RachelElizabeth

Manicure Monday #9 | Barry M Matte Nail Paint in Mocha

Matte nails are something that I’ve never quite fallen in love with. I love the idea of them, but there’s something not as satisfying as the really glossy nail I’m used to (thanks to Seche Vite). Barry M recently launched their matte range, and because they’re not too expensive – and it would be rude to turn down 3 for 2 – I thought I’d pick up three of the shades to see if I could get into the whole matte nail trend.

The Matte Nail Paint in Mocha in the bottle looks like a warm mid-tone brown. It applies to the nails much as you would expect a regular cream finish polish would and looks shiny. However in about a minute it starts to dry to a matte finish. I did two coats, and it was very smooth and even in texture. However, what I found odd about this polish – and maybe it’s due to nature of the matte formula – is that it dried to a completely different colour to what it looks like in the bottle. It ended up being a cool milk chocolatey colour, and it some lights looks almost like a purpley-taupe. I did like the colour it ended up being, but the bottle itself is a bit misleading. I wouldn’t say that the finish is completely matte either – my nails still reflect some light, but they do look almost matte.


I don’t know if I was expecting too much from this polish but it leaves me a little dissatisfied. It wasn’t as matte as I was hoping, but I don’t know if that is as matte as the usual formulas get. The colour-changing aspect also brings this product down for me as it is quite deceiving, and I do really like the colour in the bottle. So all in all, Barry M haven’t made me fall in love with matte nails, but heres hoping that another brand can. What are your thoughts on matte nails? Do you love this trend?

RachelElizabeth

ASOS Wishlist #1

When I started up this blog, my thoughts were to keep it on a strictly beauty basis. However, fashion is another passion of mine, and although I am not nearly stylish enough to be a fashion blogger, I have decided to bring some of that passion to RachelElizabeth. To ease myself in lightly, I’ve decided to bring you some of the pieces I’m currently lusting over on ASOS – I would show you all my saved items but that could possibly end up being the longest blog post known to man. So for now, I’ll give you a sneak peak…

River Island Tropical Print Trouser £35

This is probably wishful thinking on my part that I have been loving colourful summery prints recently. I love a printed trouser because they are so versatile – they can be dressed up with heels for a night out, or dressed down with flats and a jumper. This pair seem like a great transitional piece, as the length of the trouser will still keep you warm but the colours scream hot weather.

Something missing from my shoe collection is a heeled boot – I’ve been craving a shoe that isn’t too casual or too formal, and these boots fall perfectly in that category for me. I’ve been looking on lots of different sites for my ideal boot, and I thought for the price, they are pretty reasonable.

I wear a lot of high waisted trousers, so I love crop tops. I have two turtle neck crop tops already, one in white and one in burgundy – the latter being from ASOS, so I already know I like the style. I think that a black one would be a good staple for my wardrobe, and black is one of my favourite colours to wear.

My jumper collection is embarrassingly large, but for some reason I always want more. I love Monki, especially for their oversized jumpers. This navy option would fit in great in my wardrobe as I don’t own many navy pieces, and would be a good casual jumper to wear to uni. 

Midi skirts are another obsession of mine – I find them incredibly flattering and suitable for both casual and formal occasions. I love this coral colour, and as I’m clearly getting quite excited about the warmer months, this would be a perfect piece for summer. 

Did I mention I love jumpers? I am loving turtle necks at the moment, and this fluffy number is calling my name. Again, it would slot in my wardrobe perfectly with all the high-waisted pieces I own, and the cropped nature also seemingly transitions this as a spring appropriate item.

I hope you enjoyed my first dabble into fashion blogging, and here’s hoping that it becomes a regular occurrence on here. As of late, I’ve mainly been spending my spare money on beauty products, but as I’m starting to get more excited about fashion again, this is definitely subject to change. So, what’s on your wish list?

RachelElizabeth

3 Red Lips

Red lipsticks are my weakness – I have managed to build quite a substantial collection. Everybody can pull off a red lip, its just a matter of finding one with the right tone to suit your face. Personally, I wear all sorts of reds, as I normally like to play up the lips when doing my makeup. Today I bring you three of my faves, from high-end to budget friendly.

Yves Saint Laurent Rouge Pur Couture Glossy Stain – 9 Rouge Laque

The most expensive of the lineup, and one that was very hyped on its release. This was a very innovative product from YSL – if you haven’t read about/bought it already, this is a long lasting lip colour with a glossy finish. I like to apply 2 or 3 layers and blot in between to ensure the longest lasting application. The glossy finish lasts around 4 hours, and when it fades it leaves a stain on the lips. What I love about this particular formula, is that is really easy to reapply unlike some lip stains and it doesn’t dry out your lips. Shade 9 is a bright yellow toned red. 


Maybelline Superstay 14hr Lipstick in Non-Stop Red
The budget option and a Lisa Eldridge recommendation (if you don’t watch her videos on youtube, you must!). This is a really great long-lasting matte formula that really does stay on the lips for hours. You have to make sure that your lips are well exfoliated and hydrated as imperfections can show through. However, if you like a matte formula, you will no doubt enjoy this. Non-Stop Red is a bright slightly pink-toned red.


Urban Decay Revolution Lipstick in F-Bomb
Last not least, is the most classic shade of red amongst the three in this post. The release of the Revolution lipsticks was also a big one. They claim to have everything – longevity, high pigmentation and hydration. I am pleased to say that this lipstick really does deliver, and is one of the most comfortable lipsticks to wear even though it is a long lasting formula. F-Bomb is a slightly deepened blue-toned red, and one of those reds which make your teeth look really white.


I could ramble on about red lipsticks all day, and I have such an extensive list of favourites that would have made this blog post tediously long. As you may be able to tell from the three I decided to feature in this post, I love long-lasting formulas and I would recommend all of these completely. What’s your go-to red?

RachelElizabeth

Hourglass Ambient Lighting Powder

I have been quite hesitant to write this review because 1) there is so much hype around this product and 2) I’ve never really made my mind up about it. Ever since the launch of the Hourglass Ambient Light Powders the blogging world has gone absolutely crazy for them, and naturally I had to pick one up.

I went to the Hourglass counter in Liberty, and when talking with the makeup artist, she said that Dim Light was the one that I should go for. It is described as ‘a neutral peach beige powder that blurs imperfections and highlights a radiant complexion with the perfect balance of warm and cool tones’. She applied it on my face over a full face of makeup and I must admit that I was pretty impressed looking in the mirror. My face looked flawless and the powder seemed to create a blurred effect on my face. From that first application I was completely sold and got it straight away. 

However, since using this more, the initial wow-factor has definitely worn off. I generally use powder in my routine to add a touch more coverage, take away shine and set all my makeup in place. Unfortunately this powder does none of these things. The only way I use this is as a a finishing powder over my completed makeup look just as an added blurring effect. This blurred effect is not long-lasting though and it isn’t incredibly obvious. Reading others’ reviews on this powder, it seems that this is suited more to those who don’t like using a usual powder on a regular basis. 

So this was a bit of a blah product for me. Personally, for the price, it is not worth splurging as it is merely a luxury and pointless addition to my makeup collection. I admit I was drawn in by the hype of this, and I am tempted to try another colour – perhaps a more highlighting shade – just in case I really am missing something…

P.S. I am currently playing around with my schedule and contemplating making Manicure Monday a fortnightly post. When I find my perfect schedule I will be sure to update you!

-RachelElizabeth

Best Of | The Beauty Loyalty Cards

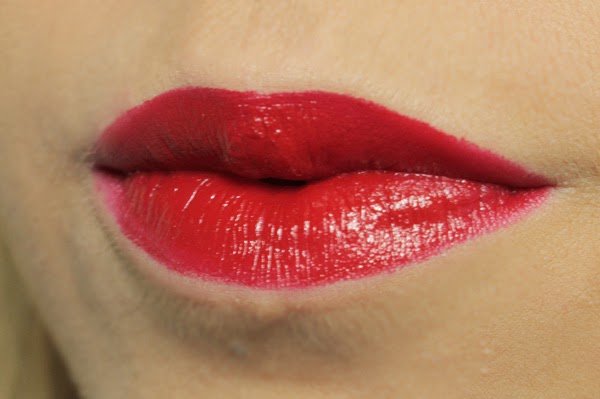
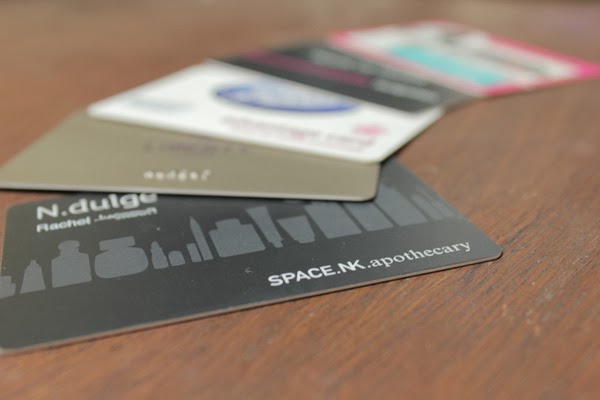
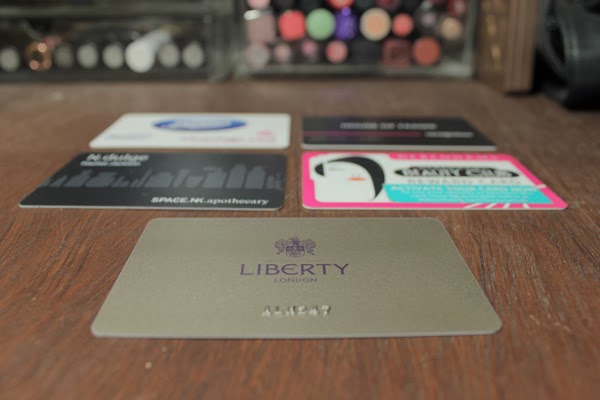
I am a sucker for loyalty cards – beauty or not, if a shop offers me some sort of free loyalty scheme I will probably sign up. Admittedly, some are better than others, but I have saved some serious cash with some of these cards. Today, I bring you the best of the best, and which ones you should definitely have in your purse. 

The Boots Advantage Card

This is the obvious choice out of the bunch and probably the one that most of you have already, but it has to be mentioned because it is my most loved and used. This option gives you 4 points per £1 you spend, and each point equates to 1p. Although this on the surface doesn’t seem like you would build up points that quickly, Boots are constantly having offers and deals to get more points with your purchase, and if you shop as much in Boots as I do, you will have no trouble in racking up the points. What’s more is that every season they send you in the post a whole load of coupons that are tailored to what you buy most often in store. And they are even kind enough to give you double points for the whole month of your birthday! The only downside is that you have to have enough points to buy the item so you can’t use your points to pay for part of a purchase. 

Debenhams Beauty Club Card
This card is similar in idea to the Boots Advantage Card, yet it gives you 3 points per £1 spent on anything beauty. 1 point again equates to 1p, but instead you get a £5 reward for every 500 points you gain. Like Boots, they regularly have events that can give you more points for your money. What is good about this card is that you can use your rewards as money off your purchase. Also, being a Debenhams Beauty Club member, they send you a code every month to get free delivery off their website, which I use regularly. The only negative is that your rewards do expire, so if you don’t use them in the allotted time you will lose your hard earned points.

House of Fraser Recognition Reward Card
This is very similar to the Debenhams Beauty Club card in the sense that it gives your points rewards in £5 increments and they can be used to pay for part of your purchase. However, it does only give you 1 point per £1 you spend making it less worthwhile than the two former cards mentioned. However, this card can be used throughout the entirety of House of Fraser, so you can earn points for clothes, home and everything else. It is worth having in your collection, but when buying beauty products, I tend to bear in mind where I can earn the most points.

Liberty Loyalty Card
This is another card that gives your points rewards in £5 increments. You earn 1 point per £1 spent, and once you reach 150 points you receive a £5 reward. Even though I don’t go to Liberty that often, this is still a useful card to get as they sell beauty brands that aren’t readily available in other places which earn you points. Spending £150 would not be that difficult in Liberty, and the rewards are actually more cost effective that all of the other cards I have mentioned so far apart from Boots (effectively giving you a £5 reward at every £125 you spend). If you don’t live in London then this is not a complete waste of time for you to own this card, as points can also be redeemed online.

Space NK N.dulge Card
Last but certainly not least is the card that gives you the most points for your money. This is also a card that gives your rewards in £5 increments and you also gain 1 point per £1 spent. However you get your £5 reward when you gain 100 points, making this the most valuable card out of the 5. As a member you also receive a free birthday gift – this year I got a decently sized oil from Nuxe. They also give you complimentary beauty samples and invites to events in store. You can also spend and redeem points online.


Even if you don’t spend an awful lot on beauty products, I personally think it is still worth signing up for these loyalty schemes as your points will slowly add up, and even if you only save a little money, you are still saving. I will warn you, some of these cards become quite the enabler, and the thought of getting more points by spending more is always very appealing for me…

RachelElizabeth

Manicure Monday #8 | Barry M Hi Shine Gelly Nail Paint in Lychee

As I’ve mentioned before, I often head to Barry M when looking for a new nail polish. They are the high street brand who are always on top of the latest nail trends, and one of the cheapest on the market as well. The Gelly Hi Shine range is an extremely highly blogged range, promising the same finish as a gel manicure. 


Lychee is a pale beige that pulls slightly yellow. On my skin tone, it is the perfect nude shade. As for the formula, it is one of the best I’ve tried. It is opaque in two coats, applies incredibly smooth and is shiny without a top coat. It is one of my most long-wearing nail polishes and I definitely want to try more of the range. 


I have just picked up 3 shades of the matte range from Barry M which I have been contemplating buying ever since the release, so expect them coming up soon on Manicure Monday…

-RachelElizabeth

Evening Skincare Routine

This post is a continuation from my Morning Skincare Routine. In the past three months or so, I’ve really had to change the products I use in the routine due to my skin becoming drier than it has ever been before as this winter approached. This routine is much smaller than I would hope it to be, but I feel like I’ve got a really good core set of products than I can continually add to.

Step 1: Remove Makeup/Cleanse
As in the morning, I use the Emma Hardie Moringa Cleansing Balm, but instead I use it twice. With a full face of makeup on, I massage it all over the face, across the eyes and lips – inevitably ending up looking like the Joker… I then take the same flannel from the morning and run under warm (not hot) water and remove the makeup and cleanser from my face. I then do a second cleanse, massaging over the skin and removing with the flannel, just like the morning. Ideally, I would have a separate cleanser for this second step, but that is currently work in progress.

Step 2: Exfoliate
Just like the morning, after cleansing I take a liquid exfoliant, and in the past few months I have finally got my hands on the Pixi Glow Tonic (this is quite hard to come buy – I got mine, and a backup or two, from the Pixi Store off Carnaby Street). This unlike my morning exfoliant, is a glycolic acid based exfoliant which helps improves the skins surface and texture. Since using this, I have noticed a significant difference in my skin in turns of blemishes and also ridding of those pesky dry patches. 

Step 3: Serum
In the evening, I am much more concerned about hydrating the skin as much as possible, as I don’t need to worry about makeup slipping and sliding off the skin. I use the Indeed Labs Hydraluron Moisture Booster which is a serum containing hyaluronic acid, which ‘can hold up to 1000 times its body weight in water’, meaning that it increases the affect of your moisturiser. This is a great serum for dehydrated or dry skin – I have dehydrated combination skin, and find this really helps hydrate my skin.

Step 4: Moisturise
Night time moisturiser has always been a category that I have struggled to find one that I really love. Many of the richer moisturisers I have tried have broken me out, which I assume is due to the ingredients. I decided to turn to La Roche Posay Toleraine Riche which is a moisturiser targeted at those with sensitive and dry skin. This is a really rich cream that gets rid of any flaky dry patches, without causing any irritation. Because of how much I love this, I am tempted to try the regular (non-‘riche’) version for the summer months when my skin is not as dry.

My skincare routine is currently quite concise, but I am constantly looking to add and improve to it. I feel like I’ve got a good core routine, and my skin has thanked me for it, despite those pesky spots that pop up at that time of the month. I will no doubt post about any new skin care additions… 


Benefit They’re Real Mascara Review

I am quite fickle with my mascaras, and don’t often like to buy the same one twice. However, I had actually tried Benefit They’re Real Mascara before just after it was released, and have only just decided to repurchase. It is claimed to be the ‘UK’s  no.1 best-selling mascara’ and I can definitely understand why. For the record, I have naturally quite long, full, blonde lashes.

The Claims:
They’re real! lengthens, curls, volumizes, lifts & separates. Our jet black, long-wearing formula won’t smudge or dry out. A specially designed brush reveals lashes you never knew you had!

The Verdict:
My favourite part about this mascara is the brush – it is a plastic wand with relatively short bristles, making it easy to get right into the roots of the lashes. The spikes at the end of the wand allows you to define inner lashes  and you can use it on the outer corner to extend the lashes to create a feline shape. It can be slightly spiky and uncomfortable to use, but when used properly this isn’t an issue.

I find that getting optimal results does require a bit of building up, but it is worth it. It gives everything that I look for in a mascara – length, volume and definition (check out the before and after pics below). I don’t think that it is the best I’ve ever tried, and it doesn’t look like I’m wearing false lashes, but it is definitely one of better ones I have tried. I do sometimes find that if I’m not wearing any eyeshadow or primer it can smudge a little on my upper lid, but this happens with most mascaras for me due to my oily lids. 


I would definitely recommend this mascara, as at £19.50 it sits at the cheaper end of the higher end mascaras, and it is popular for a reason. My favourite mascaras above this are probably the Yves Saint Laurent Babydoll Mascara and the Giorgio Armani Eyes to Kill Mascara, but they are both £24.50, making the Benefit option seem a little more cost effective.

RachelElizabeth

Manicure Monday #7 | My Nailcare Essentials

Firstly, I want to explain the lack of posts this blog has seen over the last couple of weeks. I have just come back to university and I had a lot of deadlines at the beginning of the semester and getting back into the workload has been more difficult than I first thought. Excuses aside, today’s post is the start of an attempt to get back in to the swing of things, and what better way to do that than strip it back to basics and talk about my nail care routine…

OPI Nail Envy (£18.65 here)
I use this product for two things – a nail strengthener, as its advertised, and as my base coat. This is a really great product if your nails are in a bad condition. When mine are, I paint a layer on my nails everyday for 7 days and then they are much stronger and healthier-looking. However, I’ve been using this as a base coat for a while, and my nails seem much less susceptible to breaking. If you’re thinking about getting this, it is worth checking out QVC as they have some great value deals, as the price tag can seem a little steep.

Seche Vite Fast Dry Top Coat (£9.00 here)
There is a lot hype and controversy around this product but I definitely think that it is worth the hype. It is by far the best top coat I have tried as it dries so quickly and prolongs the wear of my polishes hugely. It also makes any polish look really shiny and glossy, which is something I really like in a top coat. When I finish this bottle I may try another top coat to see if I can find one just as good without the controversial ingredients. 

Kiko Glass Nail File (£2.50 here)
This is my first venture into glass nail files, and I don’t think I will going back to regular files. I find that it creates a smoother line on the nail and it doesn’t feel as harsh or damaging. This file feels much more expensive than it is, and as usual I am so impressed by another product by Kiko. 
What I haven’t included in this post is a nail varnish remover, not because I don’t use them, but because I don’t have a favourite. I do really like the Bourjois Magic Nail Polish Remover, which I’m currently out of, but I don’t see it as essential. What I would like to get into is cuticle oils, as I’m quite lazy in that department, and I think my nails would thank me if I did. What are your nail essentials?

RachelElizabeth