Morning Skincare Routine

Over the past year or so, I have started to really care about skincare. My skin is usually oily, and is quite blemish prone, but this winter (which has never happened before) it has started to become a little more dry around my nose. In the morning, I like to focus more on prepping the skin for makeup – making the face smooth and keeping the oil at bay. However, in the evening I use more hydrating and nourishing products. I think I have finally found a simple core routine that really works for my skin, and all the fancy add ons will come in time…


The Routine

Step 1: Cleanse
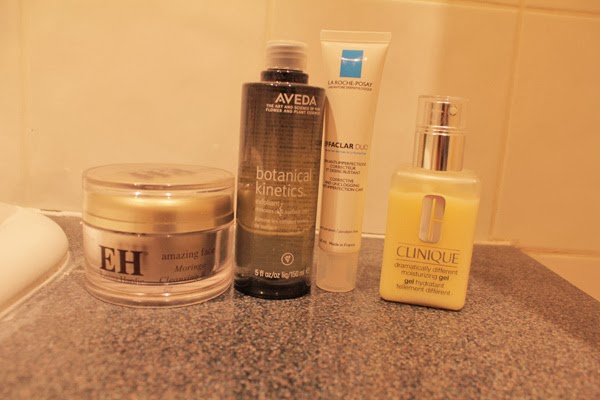
I start off my routine by taking the Emma Hardie Moringa Cleansing Balm on my fingers and massaging it all over my face. I then take a flannel and run in under warm water and remove the cleanser. This cleanser feels very luxurious and nourishing, and was quite daunting for me on first use having oily skin. This product has become one of my staples and has really helped change the appearance of my skin.

Step 2: Tone/Exfoliate
I use the Aveda Botanical Kinetics Exfoliant on a cotton pad all over the face after I cleanse as a liquid exfoliator. This contains salicylic acid, which is great for blemish-prone skin. I don’t find this to be too harsh on my skin and I am able to use this on an everyday basis. I find that it really helps to keep the skin smooth and free of any dead skin, and is much more gentle and effective than a manual exfoliant.

Step 3: Serum
The La Roche Posay Effeclar Duo is a product I would highly recommend to anyone who is prone to blemishes. It is a lightweight serum, and since using this consistently, I have noticed a significant reduction in the amount of spots I get and how long they take to disappear. This is a great daytime serum as it won’t disrupt any makeup, and surprisingly for a product aimed at oily skin it is not drying. La Roche Posay are a great affordable skin care brand that can be found in Boots and I would definitely suggest if you are on a budget to check their range out.

Step 4: Moisturise
Moisturiser is a step that I find quite hard to get right, but I’ve been really enjoying using the Clinique Dramatically Different Moisturising Gel as my morning moisturiser. I use the ‘Gel’ as opposed to the ‘Lotion’ because it is nice and lightweight and a good base for makeup. Unlike many moisturisers aimed at oily skin, I still find that this is quite hydrating, and feels cooling when applied to the skin. I like this moisturiser because it is basic and simple, and doesn’t break me out. 

So that concludes my simple morning skin care routine. These particular products I have been using for several months now, and have all been repurchased once or more. The products I use are a little on the expensive side but I personally like to invest in skincare, because a) it helps makeup apply better and b) who doesn’t want gorgeous skin? If you’re looking for amazing skincare tips and you haven’t already, head over to Caroline Hiron’s Blog as she is simply a skincare goddess and genius and I have learnt so much from reading it – the cheat sheets are incredible! 

RachelElizabeth


Manicure Monday #6 | How to Remove Glitter Nail Polish

From left to right: Barry M Superdrug 347 (Limited Edition), Maybelline Color Show Brocades in 220 Knitted Gold, Barry M 355 Gold Mine Glitter, Models Own Hedkandi in Ibiza Mix, Barry M in 150 Red Glitter

I love glitter nail polish, and I’m particularly drawn to them around this time of year – as you can probably tell from my last two Manicure Mondays posts. Pictured above are some of my current favourite glitters – I tend to gravitate towards budget brands, and in particular Barry M, as I don’t wear them too often and they do have a really great colour selection in Boots and Superdrug. The only thing that I don’t like about glitter is that is a pain to remove. I wouldn’t recommend scrubbing at your nails with a cotton pad and nail varnish remover as you may with standard nail polish as this can greatly damage and scratch the nails. Read more for my safe and easy way to remove glitter polish…

What You’ll Need:

– 5 Cotton Pads, torn in half
– Some aluminium foil, ripped into 10 pieces
– Nail varnish remover (any will do)
Firstly, I soak the cotton pad in nail varnish remover, and place over the nail, ensuring that the whole nail is covered with product. I then took one of the pieces of tin foil and wrapped it around the finger and cotton pad, then squeezing to secure. I tend to do this one hand at a time because it can get quite fiddly when most of your fingers are wrapped in foil! I leave these on my fingers for around 10 minutes, to ensure that all of the varnish has come off. Then carefully slide and remove and everything should be removed!

I hope this tip was useful, and that glitter won’t be such an annoyance in the future. 

-RachelElizabeth

Happy New Year! | My Beauty Resolutions

After some much-needed family and friend quality time over Christmas and New Year, it is time for me to get back in the swing of reality. This may seem a little late to start making resolutions, but I have been quite motivated beauty-wise and particularly about this blog…

Well first and foremost, I finally bit the bullet and got half my hair chopped off. I had my hair this length about two years ago, but didn’t really know how to style it, so just grew it out to the extremely long length I had. It was feeling extremely unhealthy, and now that its been cut it’s feeling so fresh. Hair is my main beauty resolution of this year – I want to take care of it right now before waiting for the split ends to return, and I want to be able to style my hair better.

In terms of the blog, my main goal is to become more scheduled. I have lots of ideas for new serial posts – Monthly Favourites being amongst them. If possible,  I want to figure out 3 days a week that I can post, and this will keep me constantly motivated. One post that will definitely be coming up soon is my skincare routine – I love skincare and I want to incorporate more into this blog. Watch this space this year for even more reviews, tutorials and much more.

It wouldn’t be a resolution post without including some cliches, now would it? Fitness and good health is a huge goal of mine for 2014, as is everyones, but I really want to become want to get back into the swing of the gym and eating healthily. I got into a good habit of drinking lots of water for a bit in December, and I want to really focus on this as I noticed a huge difference in my skin and overall energy levels. 

It feels good to write down these goals and it has got me even more motivated for the year to come – I highly recommend that you do the same. New Years shouldn’t be the reason to change your life, and you shouldn’t wait for it to change, but for me it’s always good motivation after Christmas to really get my life in gear! I wish you all a happy and healthy 2014, and all the best of luck with your resolutions (if you have any!).

-RachelElizabeth

Manicure Monday #5 | New Years Eve Nails

When it comes to nails at New Year, I always like to amp up the sparkle, and I usually go for a deeper colour as the base. This years look is very cliche, and somewhat reminds me of fireworks in a night sky, very appropriate for the occasion. Its also nice on New Year to pay extra attention to the way your nails go with your outfit and accessories, whether they match or contrast.

For this nail look I used Barry M Nail Paint in Navy which is a really nice long wearing navy colour. Barry M are really great for those on a budget – they’re only £2.99 and they have a really great shade range. They are also really great quality, proving that you don’t necessarily have to spend a lot in the nail department. For the glitter, I used Models Own Hed Kandi in Ibiza Mix which is a polish with a clear base and pink, blue, gold and purple glitter running throughout. The glitter particles are quite large, which give the nails more of a speckly look rather than fine shimmery glitter. I have done quite a thin coat which makes the glitter very sparse, but this is easily buildable. I haven’t tried too many Models Own polishes, but I am very impressed with this glitter. It goes on evenly, which is sometimes an issue for other glitters with larger particles, and this one in particular goes with so many different polishes. 


My last two Manicure Mondays have been very glitter-heavy and removing glitter polishes is not always easy. Stay tuned for next weeks post on my tips and tricks!

RachelElizabeth

Festive Makeup #2 | Christmas Day FOTD

Firstly, for all of those who celebrate, I hope you all had a lovely Christmas and ate your weight in gorgeous food – I sure did… Secondly, I really liked how my makeup turned out yesterday, and I used a few new beautiful products so I thought I would share with you my face of the day.

Face
Because I wanted my makeup to last all day I primed with the Hourglass Veil Mineral Primer and then used one of my favourite foundations of late – the Bourjois Healthy Mix Foundation (the old formula – I can’t comment on the current formula!). I then concealed withe the Mac Studio Finish Concealer and set it all with my gorgeous new Hourglass Ambient Lighting Powder in Dim Light  – will review this soon!

Eyes
I primed the eyes with the Urban Decay Primer Potion. I used the Charlotte Tilbury Colour-Coded Eyeshadow Palette in Dolce Vita on my eyes – I used the prime shade (a pale champagne) all over the lid, the smoke shade (a dark cool brown) on the outer corner and into the crease, and packed the pop shade (a gold glitter) on top on the prime shade. I then took a matte black, mine being from the Urban Decay Naked 2 Palette, and lined the upper lash line and smoked it out a little. I then curled my lashes and applied the Chanel Le Volume De Chanel Mascara.

Cheeks
I bronzed up the skin with Nars Bronzing Powder in Laguna, then highlighted with the Kevin Aucoin Celestial Powder in Candlelight. For blush, I went for the Tarte Amazonian Clay Blush in Exposed (sadly not available in the UK!) to keep the cheeks neutral and so they didn’t compete with the red lip.

Lips
For lips I used the Urban Decay Revolution Lipstick in F-Bomb, which is my first venture into this line, which I’ve been dying to try. Spoiler alert: this may be the start of a new addiction…


Gold and red are a classic combination for this time of year, but one that I think can work all year round. There were a lot of luxury products in this look that are heavily coveted in the blogging world, and I will make sure to let you know what I think after I’ve had a chance to work with them a bit longer.

Seeing as it’s Christmas, I want to take the opportunity to thank everyone who has supported my blog in this first month, and I am very excited and motivated for the months to come!

RachelElizabeth

Manicure Monday #4 | Festive Nails

I always overload on the glitter at Christmas, and I decided that this year I would attempt some sort of nail art. I am in no way talented at nail art, so this look is definitely simple and easy to do. This is my attempt at a glitter gradient…

For this look you will need 3 nail varnishes – one colour to go as a base, a glitter that is the same colour as the base, and a second glitter of a different colour (I think multicoloured which have the base colour in look especially good). I started by painting a layer of Kiko Nail Enamel in 240 Apple Red as my base colour and as this is a very opaque polish I only needed one coat. Then I painted Barry M Glitter Nail Paint in 150 Red Glitter (Barry M are great for inexpensive glitter polishes!) on the top two thirds of the nail, making sure the top third of the nail was thicker and gradually painting on less polish towards the bottom. Then finally I used China Glaze Nail Lacquer in Twinkle Lights (unfortunately limited edition!) on the top third of the nail, trying not to create two harsh lines by slightly staggering the glitter.

I think the combination of red, gold and green is so festive, but this look could work for any time of the year by changing up the colours. It would look great on new years eve with dark navy or purple. I don’t know how often I will venture into nail art on Manicure Mondays, but this is a nice tame start…

RachelElizabeth

The Naked 3 Weekender | Look 3

Sadly, we have come to an end of my three part series, but I thought I would end it with a bang with this dramatic smokey look. My attempt was to show the versatility of the palette and even though it is ‘rose-hued’ it doesn’t have to look overly pink. I fell in love with the colour Blackheart when I first saw it, and knew I had to include it in one of these looks. 

Look #3 – The Dramatic Smokey
I wanted the eyes to be really dark, so I started with the Urban Decay 24/7 Glide on Eye Pencil in Zero and put it all over my lid and blended out with a fluffy brush as a base for my eyeshadow. I then put the shade Nooner in the crease as a transition shade, and to keep the smokiness I used Darkside in between the black base and Nooner. I then packed Blackheart onto the lid, and the black base really helped the burgundy shimmer pop. For a bit of interest under the eye, I used the colour Buzz along the bottom lash line and Dust in the inner corner for some added brightness and sparkle. 

To add to smokiness of this look, I lined the upper and lower waterline with the Zero eyeliner I used as a base, and put a thin line of the Mac Fluidline in Blacktrack. As usual, I put heaps of the Chanel Volume de Chanel Mascara. For added drama, falsies would be a great touch. As I would wear this on a night out I contoured with Mac Powder Blush in Harmony (only available in mac pro stores) and used a little of the Mac Mineralize Blush in Warm Soul. I love pairing a nude with deep smokey eyes so that the look is all about the eyes so I chose the Tom Ford Lip Colour in Nude Vanille.


So that concludes The Naked 3 Weekender. I would definitely say that this palette is unique, and I think I will be creating infinite rose-hued looks with it. Is it a must have? For all you Naked and Urban Decay lovers out there it probably is. But for those of you who aren’t as Naked-fanatic as I am, I would suggest picking one up as they my favourite palettes I own. As for which one? If I had to choose, I would probably say that the original Naked Palette is my favourite, because the warm golden tones really suit my colouring.

RachelElizabeth 

The Naked 3 Weekender | Look 2


So today marks day 2 of my Naked 3 Weekender. This is the type of look I’ve been loving to wear on a daily basis recently, so I thought it made sense to create one out of Naked 3. I paired this with a semi-dark lip but I would definitely rock a vampy lip with this eye look. 


Look #2 – The Subtle Smokey Eye
I started with the Original Primer Potion sample that came with the palette, and  then put the light rosy-taupe shade Liar all over the lid and under the eyes. I then focused the next shade mugshot on the outer corner and half way into the crease. I then used Strange as a highlight under the brow.

To add to the smokiness of the look I lined the eyes with the Sleek Eau La La Liner in Molasses and smudged it with a pencil brush. I then applied, as usual, my Chanel Volume de Chanel Mascara. For a pretty plum flush on the cheeks I used Mac Powder Blush in Coygirl (which I love using with a  darker lip – and have just found out that this has been discontinued!). For the lips, I used the Rimmel Apocalips Lip Lacquer in Galaxy which is a light purply-plum colour.


If these last two looks have been a little too subtle for your tastes then don’t worry, I’ve got something you may enjoy in the final instalment of The Naked 3 Weekender coming up tomorrow… 

The Naked 3 Weekender | Look 1

Ever since Urban Decay announced even the name of this palette, it’s all anyone can talk about. If you’ve been living under a rock and haven’t heard of this palette or the Naked series from Urban Decay, may I present the beauty that is the Naked 3 Palette (£37 here) – the new offering of all brand new ‘rose-hued’ neutrals.

I’ve been playing with this palette for about a week now, and I will go ahead and say that I am in love. There are so many reviews and swatches of this palette so instead I thought I would give you 3 different looks I came up with everyday this weekend…

Look #1 – The Romantic


This look is very much focused on the rose-gold and lighter end of this palette. For this romantic look I started off by priming the eyes with the Eden Eye Shadow Primer Potion sample that came with the palette, and then packed Burnout on the inner two thirds of the lid, and the coppery Trick on the outer third. I took the lighter matte shade Limit and swept that in the crease to create some definition, and used the lightest shade Strange to highlight under the brow and the inner corners of the eyes. 

To finish off the eyes, I lined the eyes and did a slight wing with Mac Fluidline in Blacktrack and applied lashings of the Chanel Volume de Chanel Mascara. I bronzed up the skin with Nars Bronzing Powder in Laguna and applied Mac  Powder Blush in Pink Swoon for a light pink flush on the cheeks. For lips, I wanted a peachy nude so went for the Sleek Pout Paint in Minx


I really liked how this look turned out, and I can definitely see this becoming a go-to everyday eyeshadow combination. Tomorrows look – subtle smokey eye for everyday.

RachelElizabeth

Best of Mac | My Top Eyeshadows

So this is my second instalment of my Best of Mac series – read all about my favourite lipsticks here. Mac’s range of eyeshadows is very similar to that of their lipsticks; they pretty much have every shade you could imagine. When I’m in store I tend to gravitate towards the shades I already have without realising, so that often makes me think I’ve got most of them right. The eyeshadows in pot form as shown above are £12.50 here. I keep telling myself that I will depot all of these and put them in a palette so that I can buy them in pan form from now on. Expect a blog post when I eventually get round to that…

Brule is described as a ‘soft creamy beige’ with a satin finish. This, as you can see, was very difficult to swatch and photograph – 1) because I have very little left, and 2) it is very close to my skin tone. I think the amount of pan I have hit is a testament to how much I use and love this eyeshadow. I like to use it as a base all over the lid and up to the brow which makes eyeshadows put over the top so much easier to blend. It is also really handy to help blend harsh lines in the crease to make it seamless up to the brow. I really recommend, if you haven’t already, investing in an eyeshadow close to your skin tone for all the above reasons.

Naked Lunch is described as a ‘minimal pink with shimmer’ with a frost finish. This is a very talked-about eyeshadow in the blogging and youtube worlds, and is another of my favourites. I love putting this all over the lid for an everyday look, or smoking it up with darker shades. It isn’t overly sparkly, but it is nicely frosted and creates a nice sheen on the lids. This is a must have for any neutral eyeshadow lovers.

All That Glitters is described as a ‘beige with gold pearl’ with a  veluxe pearl finish. This is another very hyped up shadow, and probably because of Ellie ‘Allthatglitters21’ on youtube, and several other bloggers and you tubers that all swoon over this eyeshadow. I really like this shadow, but, especially when I’m pale, I can find this difficult to wear. It sometimes comes up a bit too orange on me, so I have to pair it with a less warm shadow in the crease. Veluxe pearl is my favourite finish though – they are incredibly pigmented and smooth, and have really pretty sheen running throughout. I think this shadow would work very similar to Naked Lunch and would look incredible on medium skin tones (I love this when I’m tanned!).


Woodwinked is described as a ‘warm antique gold’ with a veluxe pearl finish. If you have blue eyes and don’t have this colour, you need this in your life! This brings out the blue in my eyes so much and I find it really flattering. It’s one of those versatile shades that you can put all over the lid and blend slightly in the crease and it looks like you’re wearing two different colours with minimal effort. This is also a go-to for me for smokey eyes as it really glams up any look. Like All That Glitters, this looks better on when I am more tanned, as it can lean a little orange. But it’s so beautiful I wear it regardless!


Patina is described as a ‘taupe brown with a golden pearl’ with a frost finish. I find the combination of the cool base colour with the shot of warm flecks throughout make this shade really unique. It’s a shade like Woodwinked where it is very versatile, and I often wear this shade all by itself. It doesn’t look very exciting in the pan, but on the eyes this is such a flattering colour, and it isn’t overly shimmery. One of my all time favourite eyeshadow looks is wearing this on the lid and putting Satin Taupe (up next!) in the crease.


Satin Taupe is described as a ‘taupe with silver shimmer’ with a frost finish. This is another cult shade and is definitely up there for me. Even though this is a neutral shade, it can lean more purple when paired with other peoples, making it a really versatile shade. It is a great colour to pair with lighter shades to smoke them out a bit, or to wear it all over the lid. Overall a really interesting and must have shade.


Sumptuous Olive is described as a ‘khaki with pearl’ with a veluxe pearl finish. Green is one of the only ‘colours’ I venture in with eyeshadow, and if you are a neutral lover but want to inject some colour this would be a good place to start.  This is another of those shades I like to wear alone on the lid and up the crease. This shade is almost duo chrome – when paired with browns it leans more gold, but when paired with a darker green in the crease the green really pops. It is a really easy shade to wear, and still looks relatively neutral on the eyes, but is just that little bit more interesting. 

Plum Dressing is described as a ‘pinky-plum with metal’ (a slightly odd description?) with a veluxe pearl finish. This isn’t as pigmented as the other veluxe pearl finishes I own, but with this shade I prefer it so it isn’t quite so bold. Burgandy and plum are also colours I sometimes like to wear, especially in the crease with a lighter gold or beige on the lid or all over the lid and smoked out with darker plums and browns. I have to admit that this is my least used shade of all the ones mentioned in this post, but when I am feeling bold enough to wear it, it really does look good on the eyes. 

My collection of Mac eyeshadows is rather small compared to some, and I am sure mine will continue to expand in the future. They really are great quality, but with the amazing palettes currently on the market, I often find myself forgetting about them! Coming up soon – everything else I love from Mac…

-RachelElizabeth