Maybelline Color Drama Lipstick in Red Essential | Review and Swatches

When I was in Boots the other day (are we surprised?) I was browsing the Maybelline products and spotted something I had never seen before tucked away in the lip section. They was nothing to say they were new and I haven’t heard anything about these anywhere, so the blogger in me was very excited about this unknown potential treasure. When I read on the label Intense Velvet Lip Pencil, I instantly thought these may well be a dupe for the Nars Velvet Matte Lip Pencil, which I love (post on Red Square here). I am having a serious matte lip moment, so I had to try one of these out…

The Maybelline Color Drama Lipstick in Red Essential is a deep, slightly cool-toned red. It sits somewhere in the middle of the classic red lip and a deep vampy shade. I was very surprised at the formulation of this lipstick – despite it being incredibly matte, it was very smooth and creamy to apply and feels similar to the Nars offering. It isn’t terribly lightweight on the lips – it definitely feels like you are wearing lipstick – but I wouldn’t say that it is uncomfortable to wear. Although it isn’t hydrating by any means, it was not particularly drying compared to some other matte formulas. I was blown away by the lasting power of this formula; it wore incredibly throughout the day with no signs of awkward fading in the centre of the lips and even held up well through eating and drinking. 


I am over the moon with this unexpected purchase and I couldn’t recommend this lipstick enough! And I haven’t even mentioned the best part… they are an absolute steal at £4.99. I am without a doubt going to pick up some more shades to test out and review as I am completely blown away. Good job Maybelline.

RachelElizabeth

Manicure Monday #19 | Nails Inc Gel Effect Polish in Porchester Square

If you read my last Manicure Monday you would have know that I recently picked up the Nails Inc Holiday Wardrobe. As I mentioned in that post, this set has been impossible to track down online, but I’ve seen it pop up in most of the bigger Boots that I have been in recently. This week we are focusing on the shade Porchester Square, that thanks to the amazing Anna from Vivianna Does Makeup (who loves the shade) I had very high hopes for…

Porchester Square is the classic ‘greige’ shade. It’s a beige that leans slightly to the cooler grey side with a slight lilac tinge. The colour is an absolutely winner for me – it’s a great alternative to a nude mannequin nail as it doesn’t completely blend in with your skin tone, but still looks sophisticated and polished. However, I’m still a little on the fence about the formula. Because it claims to be ‘Gel Effect’ I expected it to last considerably longer than other polishes I own, but that just wasn’t the case. It wasn’t the worst in terms of wear, but it sits somewhere in the middle of the polishes I’ve tried in terms of longevity. The Kensington Caviar Top Coat that came in the set also did nothing to help the wear of this polish, but I did find it to be much better when using Seche Vite or Sally Hansen Mega Shine. 


Don’t get me wrong, it looks stunning on the nails. They look glossy and plump, almost as if you had had a gel manicure, but the wear time really let this formulation down. I’ve heard great things about this formula so I’m wondering whether this is just a personal issue I’ve come across. They are available individually for £14 here. Have you tried the Gel Effect polishes?

RachelElizabeth


Urban Decay Revolution Lipstick in Streak | Review and Swatches

As I mentioned in my last lipstick-centric post here, I just haven’t been reaching for the bold lip colours as much these days. I have been all over the darker nudes and peachy pinks and some on the new shades I’ve been picking up have already shot up there with my favourites. This one in particular is becoming very highly valued in my collection…

Urban Decay Revolution Lipstick in Streak is a warm toned peachy pink. Its quite a hard one to describe because its bright but very muted and wearable – almost a muted neon. As you may be able to tell, I had hit the fake tan bottle pretty hard before this photo was taken and I think this shade looks great when my skin is that little bit deeper. In terms of the formula, there isn’t much to say other than it is incredible. I have tried one other shade from the line, F-Bomb (blogged here), and it is just as good. They are so incredibly creamy, pigmented and long lasting, and I honestly cannot fault this range. 


Short and sweet, this stuff is amazing and you need at least one of the range in your life if you’re a lipstick junkie like myself. 

RachelElizabeth

No7 Beautiful Skin Melting Gel Cleanser | Review

I realised one day when I was browsing the aisles of Boots (a.k.a my second home) that I hadn’t tried that much budget-friendly skincare. My philosophy has always been to invest in the products I use on my skin so I tend to ignore the more affordable options. Obviously this isn’t practical or feasible for everyone; admittedly I do wince when I fork over the cash for some high-end skincare, so I decided to try and hunt out the hidden gems on the high street…

Of course there is a reason why some products are cheaper than others, and there are some pretty dodgy ingredients lists in the budget skincare department but this doesn’t mean this is applicable to every cheaper option. When I was searching for a cleanser, I came across the No7 Beautiful Skin Melting Gel Cleanser which had a promising list of ingredients. I try to stay away from any butters (Shea and cocoa in particular), mineral oil and fragrance as I know that these have aggravated my skin in the past. The No7 offering is free of those except fragrance, but it is quite far down the list. The texture is quite interesting – you would typically expect a gel cleanser to be quite drying but this feels quite nourishing on the skin. As with all cleansers, I remove my makeup first (Body Shop Cleansing oil post here) and then massage into clean, dry skin. I then rinse a flannel under warm water and remove the cleanser from my face. It leaves the skin feeling clean (but not that stripped and squeaky clean) yet nourished and hydrated. 


I have been using it for about a month, and my skin is in pretty good condition right now. My skin hasn’t shown any adverse reactions to this product and it is fitting nicely into my skincare routine as a good simple cleanser. I have normal to oily skin, and although this cleanser is targeted at dry skin it still works perfectly fine for me. For £9.50 I think this is a steal, and I can definitely see myself repurchasing this in the future. 

Have you tried any No7 skincare? I am now very intrigued about the rest of the line…

RachelElizabeth


Manicure Monday #18 | Nails Inc Holiday Wardrobe

Nails Inc are a brand I’m really starting to fall in love with. Some of my favourite nail polishes are from them – check out previous Manicure Mondays on Baker Street and Queen Victoria Street. Surprisingly enough I have never tried the Gel Effect formula, and when I saw this gift set, I knew I had to pick it up.

The set includes three Gel Effect polishes: Porchester Square (a grey-toned beige), Regents Place (a light powdery blue) and Covent Garden Place (a bright warm-toned pink). It also contains the Kensington Caviar top coat. The set is worth £54 but retails at £25 making it an absolute steal! The only problem is that I cannot find this anywhere online, but I got it very recently from my local boots. If you’re interested in trying these shades, it is worthing trying to hunt down this set. You can buy the polishes individually here


I am yet to try these yet, but make sure you check back every monday where I will be reviewing each of these shades in a Manicure Monday post! 

RachelElizabeth

Mac Velvet Teddy | Review and Swatches

I, just like everyone else right now, am loving Kylie Jenner, especially her makeup. She and many other celebrities are bring back the 90s in a big way, and these darker matte nude lips are everywhere at the moment. When Debenhams had the offer for £5 off any lipstick to celebrate national lipstick day, I decided to take the plunge and order this which has been the top of my wishlist for quite some time now…


Mac Velvet Teddy Lipstick is described as a ‘Deep-tone beige’ with a matte finish. It is definitely on the brown side of nude, and for my skin tone (currently around NC25) it is a dark nude. As far as the formula goes, it isn’t as drying as some matte lipsticks can be. It is in no way hydrating for the lips, but I don’t find that it dries out the lips particularly. It applies incredibly creamy and smooth, and is comfortable to wear. The great thing about a matte finish is the longevity; even though this is a lighter colour, the wear time is still very good. I would say that this lasts around 4-6 hours on me, depending on eating and drinking habits, and with lipliner, this will stick around most of the day. A lipliner I would recommend that is practically the same shade is the Kiko Precision Lip Pencil in 300 Caffe Latte.


I’ve been gravitating towards lighter lips rather than my usual love for bold lips, so expect many more blog posts on all the new lipsticks I’ve been picking up! Are you into this dark nude trend?

RachelElizabeth

The Body Shop Camomile Silky Cleansing Oil | Review

If you read my evening skincare routine post you would know that I love the Emma Hardie Morninga Cleansing Balm for removing my makeup. I absolutely adore the product but I don’t love the price tag. When I was reaching the end of it, I was on the lookout for something slightly more affordable that I could use as my first cleanse. So I gave into the hype and bought this Body Shop offering…

The Body Shop Camomile Silky Cleansing Oil retails at £10. I massage one pump into a dry fully made up face and work the makeup off my face and eyes. I then run a flannel under warm water and wipe off all of the product. I only use this product as a makeup remover, and I would then go in and cleanse the skin afterwards. This works amazingly for removing any sort of makeup, even waterproof mascara, and works in a matter of seconds. It doesn’t irritate my eyes at all, but bare in mind I don’t have particularly sensitive eyes. I do however have blemish-prone skin, and this has not made me break out whatsoever. For those of you with oily skin who run a mile from any product that mentions the word ‘oil’, do not be afraid to try this product. Using a flannel completely gets rid of the oily feeling on the skin, and it doesn’t leave any sort of greasy residue on the skin.


If you’re the kind of person who likes things to be quick and simple, this is definitely a product worth considering. It eliminates the need for a separate cleanser and eye makeup remover, which definitely gets a thumbs up from me. Have you ever tried cleansing oils? Which is your favourite?

RachelElizabeth 

L’Oreal Color Riche L’Ombre Pure Eyeshadows | Review and Swatches

Unlike many of the latest hyped beauty releases, I actually picked these up before I had heard anybody talk about them. Eyeshadows is one of the areas of beauty that the budget options just generally don’t perform that well. Of course there are exceptions, and the L’Oreal Infallible Eyeshadows are definitely the best I have come across. So when I saw that L’Oreal had released another line of single eyeshadows I was very intrigued, and couldn’t stop myself picking up a few to try out.

The L’Oreal Color Riche L’Ombre Pure Mono Eyeshadows are separated into 5 different categories: Nude, Smoky, Lumiere, Matte and Pop. The Nude and Smoky formulas feel much like a pressed pigment, and are quite similar to the Infallible shadows. They are both incredibly pigmented, buttery and shimmery. The Lumiere seems very similar to the formula of shadows like the limited edition Mac Extra Dimension Eyeshadows or the Estee Lauder Pure Color Gelée Powder Eyeshadows. They are very smooth and feel almost like a cream and are beautifully pigmented. As for the Matte and Pop shadows, I am yet to try them, although when swatching them in store, they seemed a little hit and miss.

Nude 204 Golden Nude is a light shimmery champagne shade, perfect for an all over lid shade or inner corner highlight if you have deeper skin. It has got a bit of glitter in but it’s nothing too chunky or overbearing. Smoky 202 Die For Chocolate is a gorgeous deep warm brown shade with a golden sheen. Warning on this shade – mine has actually crumbled when travelling, and this is because of how soft and buttery the shades are. It is still usable, but it is now irritatingly messy and I thought was worth mentioning. 500 Lumiere Gold Mania is a stunning true gold shade. 

Die For Chocolate, Gold Mania, Golden Nude

I would 100% recommend these to any eyeshadow lover, especially as they’re only £5.49 a pop! They are a great budget option, and I have honestly been reaching for these over some of my more expensive shadows. Have you picked up any from the range yet? 

RachelElizabeth

L’Oreal Glam Bronze in Golden Bronze | Review

If there is one area that the high street hasn’t quite nailed on the head, it’s bronzers. There’s something about the budget options that is always a bit off. They’re normally too shimmery, too orange, too patchy… The list goes on and on. When I was browsing the aisles of Boots and spotted this new release from L’Oreal, I was very intrigued. From just looking at it from afar, I could tell that it was a gorgeous shade, and I had to pick it up. So prepare yourself, I may just have found the perfect budget bronzer…

The L’Oreal Glam Bronze in Golden Bronze retails for £7.99. There are two shades in this line, and this is the darker of the two (if you’re very pale, the lighter shade may be worth checking out!). It is a somewhat neutral bronzer; it is not overly red, orange or grey based, and sits somewhere in the middle of all of those. I sit somewhere between an NC20 and an NC30 and I find this too be a perfect shade of bronzer for me, particularly when I’m tanned. It is completely matte, which I love, and therefore can be used for both bronzing up the skin and contouring. 


It is quite pigmented, but not so pigmented that it becomes difficult to apply or blend into the skin. It applies beautifully and evenly to the skin and also wears incredibly well – longevity tends to be an issue for me when it comes to budget cheek products. 

This bronzer has definitely surprised me and is up there with my absolute favourite, Nars Laguna. If you’re in the market for a new bronzer, I would highly recommend picking this up!

RachelElizabeth

How To Depot Mac Eyeshadows

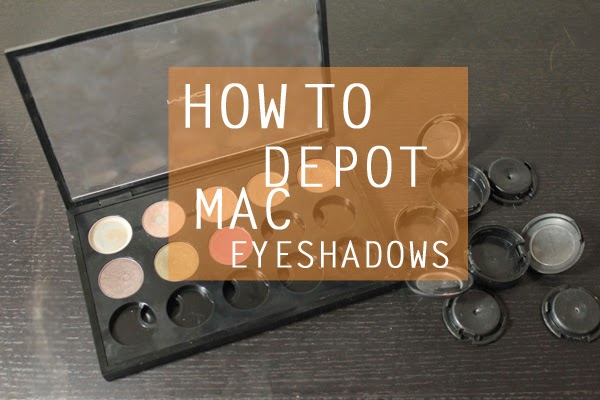
As I mentioned in my Top Mac Eyeshadows post, I have been meaning to depot my Mac collection for the longest time. I found that I just wasn’t reaching for the individual pots, so I wanted to be able to store them all together. It is also a lot cheaper to buy the shadows in the pan form, so making a palette is also a great investment. Keep reading for a step by step tutorial on how to depot your shadows…

What you will need:

  • Baking/parchment paper
  • Straighteners
  • Something sharp (I used nail scissors but a sharp knife would also work)
  • Self adhesive magnets or magnet tape (I bought mine off Amazon here)
  • A Mac palette or Z palette 


Step 1
Be very careful for this first step! Use your sharp scissors or knife and wedge it into the ridge labelled in the picture above. This should then lift up and you can remove it from the outer casing. This step was easier in some eyeshadows than others, but with practice you’ll get the hang of it in no time.


Step 2
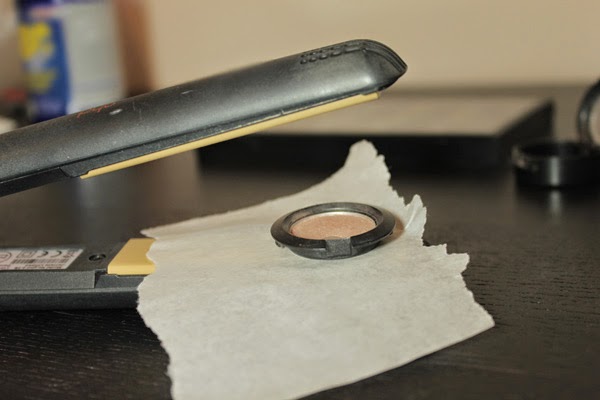
Turn on your straighteners and place a small piece of the baking paper on top of them. Once they are heated up, place your eyeshadow directly on top of the paper and leave to sit for about 30 seconds. The purpose of this step is to slightly melt the plastic casing and the glue holding the shadow in place.
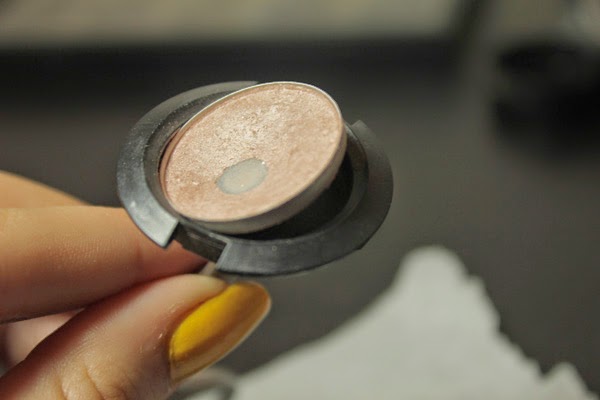


Step 3
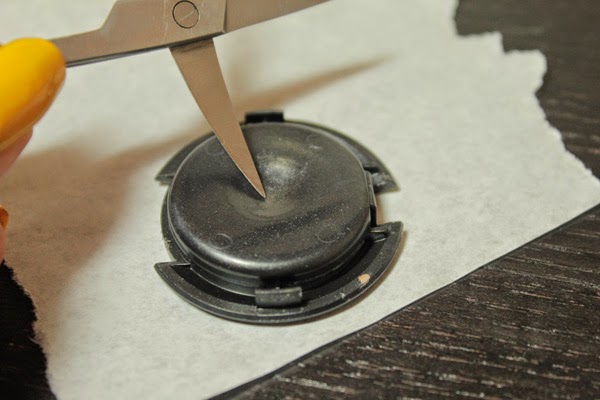
Once you see a dip in the middle of the plastic casing as above, carefully remove the shadow from the straightener and place it face down on some baking paper. Then take your sharp tool and push it directly in the middle. If it is extremely difficult to pierce the plastic, place it back on the straightener for a little longer. 


Step 4
Once your knife or scissors have broken through the plastic, the eyeshadow pan should lift away from the plastic like so. Carefully place the eyeshadow face down on the baking paper. The bottom of the pan, where the glue holding the eyeshadow in place was, will be extremely hot.
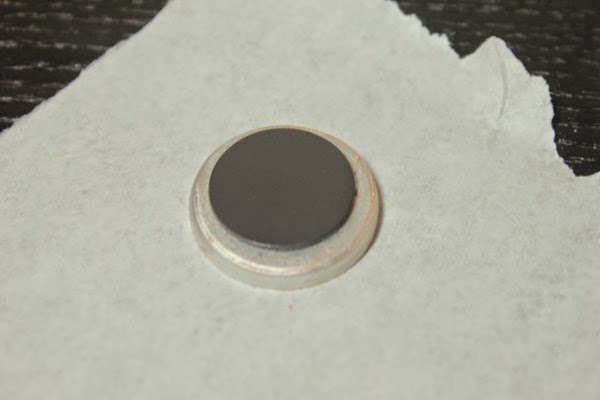


Step 5
Once you have left the pan to cool slightly, now it is time to place your magnet. I recommend buying small self-adhesive magnets like the ones that I have used as they were really easy to apply and are just a bit smaller than the pans, making them the perfect size. 
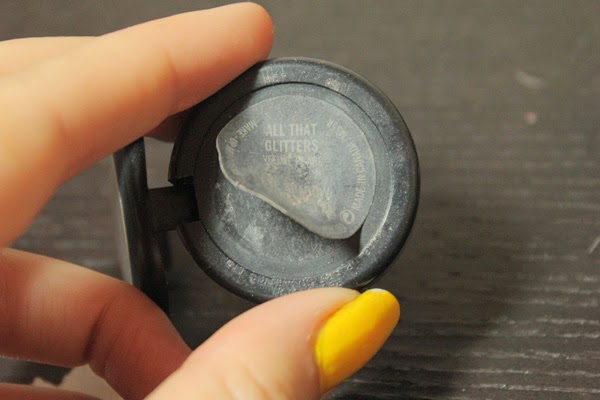


Step 6
Now it is time to label your shadow. You can either make your own new labels or simply take them off of the old shadow pots. I found that with most of my eyeshadows, the labels peeled off really easily, and they were sticky enough to place directly over the magnet. However, if you’re having trouble adhering them to the pan, I suggest using glue or any other adhesive. 


And there you have it! A fully depotted Mac eyeshadow. I was expecting this to be a lot harder, but it is surprisingly simple to get the hang of it. If you’re looking to follow a video tutorial, I found Marlena from Makeup Geek’s to be very helpful (here). I hope you found this somewhat useful, and have fun creating your own Mac Palette!