L’Oreal Glam Bronze in Golden Bronze | Review

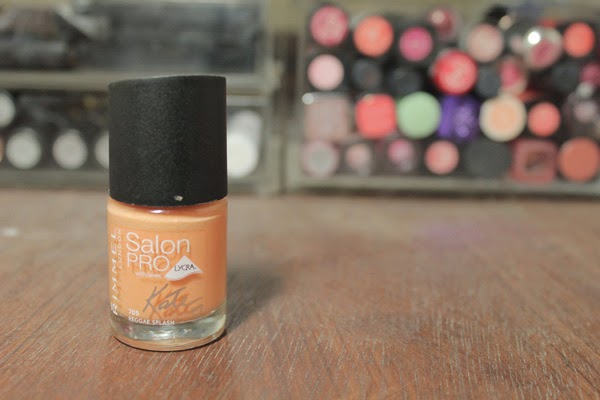
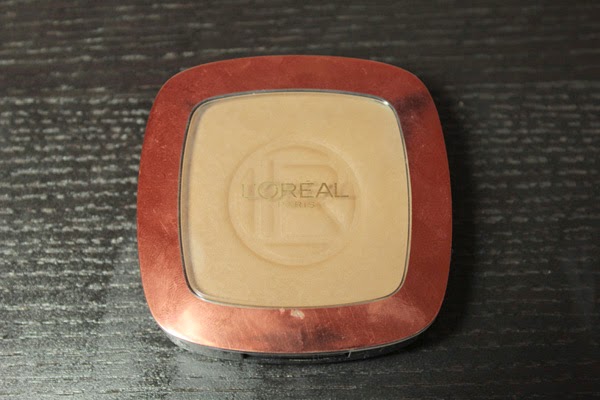
If there is one area that the high street hasn’t quite nailed on the head, it’s bronzers. There’s something about the budget options that is always a bit off. They’re normally too shimmery, too orange, too patchy… The list goes on and on. When I was browsing the aisles of Boots and spotted this new release from L’Oreal, I was very intrigued. From just looking at it from afar, I could tell that it was a gorgeous shade, and I had to pick it up. So prepare yourself, I may just have found the perfect budget bronzer…

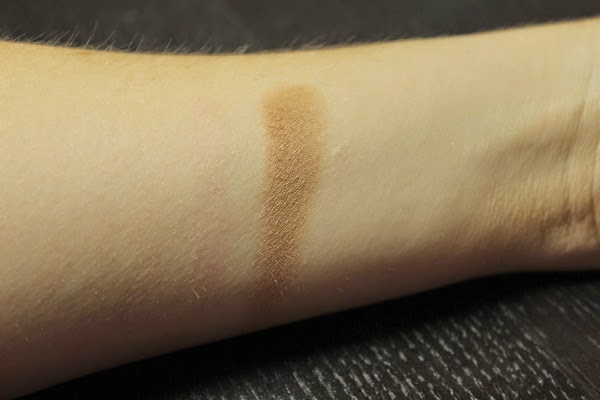
The L’Oreal Glam Bronze in Golden Bronze retails for £7.99. There are two shades in this line, and this is the darker of the two (if you’re very pale, the lighter shade may be worth checking out!). It is a somewhat neutral bronzer; it is not overly red, orange or grey based, and sits somewhere in the middle of all of those. I sit somewhere between an NC20 and an NC30 and I find this too be a perfect shade of bronzer for me, particularly when I’m tanned. It is completely matte, which I love, and therefore can be used for both bronzing up the skin and contouring. 


It is quite pigmented, but not so pigmented that it becomes difficult to apply or blend into the skin. It applies beautifully and evenly to the skin and also wears incredibly well – longevity tends to be an issue for me when it comes to budget cheek products. 

This bronzer has definitely surprised me and is up there with my absolute favourite, Nars Laguna. If you’re in the market for a new bronzer, I would highly recommend picking this up!

RachelElizabeth

The Best Lip Glosses Ever? | Revlon ColorBurst Lipgloss Review

Now, don’t get me wrong, I am not the biggest lipgloss fan. For one, I prefer the look of a more matte finish lip product on me, but most of all, I don’t like the feeling of lipgloss on my lips. With most formulas I’ve tried, they are far too milky, separate on the lips and are way too sticky. However, despite my somewhat rocky relationship with lipgloss, I wasn’t quite ready to give up on finding the perfect formula. And I think I may have just found it…

The Revlon ColorBurst Lipglosses retail for £7.99 making them an absolute steal. I have four shades of the range (which is actually quite extensive), and the formula is pretty darn consistent throughout. Papaya is a bright coral shade, which leans more on the red side of coral than the pink, and has a subtle  golden shimmer running through it. Adorned is an extremely bright blue-toned fuchsia with pink and purple shimmer. Bordeaux is a deep wine shade, with the same subtle golden shimmer as Papaya. Peony is a peachy-pink with lots of golden and peach shimmer. 


The best performing shade of the four is by far Adorned. It is probably the most pigmented and smoothest lipgloss I have ever tried, and it wears for such a long time. The other three shades are still beautiful lipglosses. The formulation isn’t too sticky, but is still very long lasting. They smooth over any imperfections on the lips and just make your lips look very luscious and full. 


From left to right: Papaya, Adorned, Bordeaux, Peony

If you like lipgloss, you will love these. Because they are so pigmented you can wear them on their own, but I personally like to layer over lipsticks for an even longer lasting lip look. 

Manicure Monday #16 | Barry M Gelly Nail Paint in Blueberry

Funnily enough, I used to detest blue nail polish. I hated how it looked on my nails and I would never wear it. Over the past year or so, my favourite nail colours are generally shades of blue (Nails Inc Baker Street being a prime example). Recently I’ve been pining over these gorgeous pastel periwinkle shades, and today I bring you a new favourite in my collection. 

Barry M Gelly Nail Effects in Blueberry is a gorgeous light periwinkle shade. I find that it is a little too dark to be a pastel, but it isn’t overly bright – it sits somewhere in between. As I have mentioned before, the Gelly range from Barry M is incredible – it lasts a really long time on the nails, it is seriously opaque, and the shine competes with Seche Vite. I think that this is one of the newer shades of the line, and it makes me incredibly excited that they will be continuing to add to the range. 


I am obsessed with this colour, and can see that it is going to be a spring and summer staple. This range is quickly becoming my favourite budget nail polish line – it has something for everyone and the formula is to die for. 

RachelElizabeth

Sleek Eyebrow Stylist | Review


I’m not one to try too many brow products – I’ve found one I like (Mac Eye Brows in Fling if you’re wondering) and I have consistently repurchased. This may come as a surprise as I am quite fickle when it comes to other makeup categories… However, when there is a lot of hype around a product, I do become a little intrigued, and normally it’s not too long before it’s in my basket and coming home with me.

The Sleek Eyebrow Stylist (£5.99) comes in three shades. Having blonde hair, I picked up the shade light. My eyebrows are quite dark, but I tend to pick lighter shades so that they don’t look too stark against my hair or skin. This pencil is quite a sheer formula, which I quite like in a brow pencil – it makes it much harder to go overboard. It’s also quite a hard pencil, which is great if you want a more natural look, and will last longer than a creamier formula as you won’t use as much product. In terms of the shade, it matches perfectly with my brows – it isn’t too warm and orangey or too cool and grey. It sits in the middle, creating a natural looking shade. The pencil is quite thick, which makes it hard to create individual brush strokes, but if you only need to fill in sparse areas, this isn’t an issue. It also has really good lasting power.

The addition of the spoolie is one of the best aspects of this product. A lot of brow products are including them now, and I think that they all should. Brushing the brows up before applying the pencil allows you to shape your brows, and then brushing them through after application makes them look much more natural.

Below is a before and after of my brows:


As you can see, I have pretty full brows, but they are a little bit sparse, particularly at the front. This brow product is great for natural looking brows, and I would say great for those who haven’t tried brow products before. It’s pretty foolproof, and almost impossible to have a heavy hand. I really like this brow pencil – I don’t know if it has quite overtaken my love for the Mac offering, but it is definitely a close one. 

RachelElizabeth

Manicure Monday #15 | Tanya Burr Penguin Chic

Tanya Burr’s lipgloss and nail polish line launched in store in Superdrug last week, and I had to pick some up (check out yesterday’s post here for a review of the lip glosses). It’s so exciting to see YouTubers and bloggers popping up in the shops – they’re becoming such an integral part of the beauty industry and I’m all for it.

Unfortunately, the Superdrug I went in wasn’t fully stocked, but the one that caught my eye was Penguin Chic. It’s a gorgeous taupe, and great for those who don’t love wearing bright colours on the nails or don’t want their nails clashing with their outfit. In terms of the formula, I was pleasantly surprised. It was smooth, and applied opaquely in two coats. I also really like the brush – It is standard, and on the thinner side, but I found it really easy to paint my nails with.


If I had to choose, I would say the nail polishes are my favourite of the line. This may well be because I am a nail polish addict, but I think that these are really well formulated, and there is a nice colour range. At £5.99, these are very reasonably priced, and I would definitely recommend picking one (or several) up if you are in the market for some new nail polishes. They are available in store in Superdrug and online at FeelUnique. I know that I will probably end up with a few more in my basket…

Tanya Burr Lip Gloss Review & Swatches | Just Peachy & Picnic in the Park

It’s always exciting when YouTubers or bloggers are able to further their career outside of their channel or blog. Blogging is really a force to be reckoned with in the beauty industry, and it shows the influence that all the big bloggers have over the mainstream customers. Unless you’ve been living under a rock, you’ve probably heard that Tanya Burr has released her own lip glosses and nail polishes. I was a little wary at first, as they were only available online, but once they were released in stores in Superdrug, I definitely had to pick some up.

The lip glosses retail for an affordable £6.99, and for those outside of the UK can be purchased here on Feelunique. I’m not normally a lip gloss gal, so when looking through the shades, I decided to go for some lighter shades that were more appropriate for everyday wear. The first shade I picked up was Just Peachy. I will warn you that this is a very light shade, and worn on its own (swatched below) it is almost too light for me. It is slightly milky and slightly accentuated any imperfections in my lips, so you will need to exfoliate and hydrate before using this one. However, when using this over lipstick, it works great at toning down and lightening shades, so is perfect to pair over shades that are maybe a touch too dark for your skin tone. 


The second shade, and probably my favourite out of the two, is Picnic in the Park. This is a pretty mid-tone pink shade, that I found really brightened up the face. It has a similar milky texture as Just Peachy but it applied much more smoothly onto the lips. Both shades have a nice amount of shine, and are sticky in formula but nothing too overbearing. I find that stickier lip glosses tend to hang around longer on the lips, and these glosses lasted a good few hours before fading. 

Just Peachy


Picnic in the Park


I’m not completely blown away by these, but they are decent glosses. I am all for supporting any bloggers or YouTubers, and I think Tanya has done a pretty good job here. Stay tuned for tomorrow’s Manicure Monday for a post on one of the nail polishes in the range. Have you tried any of Tanya Burr’s products?

RachelElizabeth

Manicure Monday #14 | Barry M Berry Ice Cream

I’m not one for being too girly, but there’s something about pastels (regardless of the shade) that I gravitate towards at this time of year. I love the look of fresh, soft and feminine nails during the transition to spring – injecting colour into my wardrobe is never a bad thing, either…

Barry M Nail Paint in Berry Ice Cream (Boots list this as Ice Cream Purple)


The ice cream collection was a massive hit for Barry M a couple of years ago, consisting of pretty pastel shades, perfect for the spring and summer months. Berry Ice Cream is a perfect pastel lilac shade, which I find looks pretty fun and girly on the nails, but still looking more sophisticated than a barbie pink. As I have mentioned many times before, I love Barry M nail products. They are one of the most popular nail brands in the UK and also one of the cheapest, making them extremely accessible. The formula is great – it is not too thin nor too gloopy, and provides a shiny opaque finish in two coats. I find that all Barry M nail paints last well on my nails, not chipping for about 4/5 days.

Are you loving pastel nail colours as much as I am? Every time I paint my nails I can’t wait to put another fun colourful colour on!

RachelElizabeth


Real Techniques Miracle Complexion Sponge | Review

I have never been one for makeup sponges – I have always associated them with the cheap sponges that come with high street powders that I used to use and how dirty they would always become. Surprisingly, I was never sucked in by the Beauty Blender. I’ve always opted for brushes, and honestly the price has always put me off. But when my favourite affordable brush band (and one of my favourite YouTubers Pixiwoo) comes out with an alternative that everybody is obsessing over, that is definitely coming home with me. 

Real Techniques Miracle Complexion Sponge

My primary use for this sponge is for liquid foundation. When using it damp, it provides a flawless-looking coverage that isn’t too sheer or too full coverage. In terms of comparing it to other forms of application, it sits somewhere in between using your fingers and a brush (fingers being the sheerer option and the brush building to a more opaque coverage). I find that it works well for most formulas of foundation, except those that are water-based (e.g. Mac Face and Body) because the sponge tends to soak up more of the product. I like to use this when I don’t want too heavy coverage and have a bit more time on my hands – I find that this method takes far longer than any other application method.

The shape (similar to the Beauty Blender) is oval, one side being rounded, the other half flat and a pointed tip. The rounded side is the one I use for the majority of my face. I like to dip the damp sponge into some foundation on the back of my hand, and use a stippling/rolling motion across the face. The flat edge of the sponge is really good for getting the foundation in those tricky to reach areas such as the contours of the nose and underneath the eyes. 

However, it doesn’t just stop at foundation. If you like to use concealer to highlight under your eyes and on the high points of your face, this is great at blending it seamlessly into your foundation. Same goes with any other cream products – blush, bronzer, highlighter etc. Another tip is that if you go a little overboard with blush or bronzer, then simply tap this over and it will sheer it out. 

So am I now a sponge convert? I’m not so sure, as I love applying my makeup with brushes. But this is a really nice method for applying foundation. One con for me personally is that I have to clean it after every use because I’m a bit of a germ freak when it comes to face brushes. Whereas I can spot clean my brushes with a bit of Mac Brush Cleanser, for this I have to really work at it with baby shampoo, which admittedly I often forget to do meaning I end up choosing another method. However when I do clean it, I really enjoy using it. It’s really affordable so I would definitely recommend picking it up.

If my explanation didn’t quite cut it for you, check out Sam’s video explaining all its uses and applying it on camera here.

-RachelElizabeth

Manicure Monday #12 | Rimmel Salon Pro by Kate Moss in Reggae Splash

I am surprised that I have never mentioned my love for the Kate Moss for Rimmel collections on here yet. Everything they brought out was hugely surrounding by hype, and the nail polishes were no exception. Both the lipsticks and the nail polishes have a great variety of shades, and of course today I am showcasing a very spring appropriate shade. 
The first thing I will address is the brush – for those of you who are fans of the extra wide brush that covers your nail in one swipe, look no further. Personally, I prefer the precision of a thinner brush, but I can’t deny the convenience and quickness of the wider brush. The formula is very smooth and easy to apply, but I found that this particular colour needed three coats to be completely opaque. However, the colour and the final effect is really nice – it is a bright enough peachy orange to be noticeable and fun, but not so bright that is obnoxious. I find this formula to be relatively long-wearing and doesn’t chip too easily. At £4.49, and Boots constantly having offers, I definitely think it is worth picking up a shade or two.


I’m still loving all these summery colours, and I don’t doubt that for the foreseeable future Manicure Monday will consist of light, bright and summery shades. What’s your go-to spring nail shade?

RachelElizabeth

Hair Care Routine | Charles Worthington Volume and Bounce Review

I am no expert when it comes to hair – I prefer to be low maintenance when it comes to styling on an everyday basis, so I tend to look for products that can create nice textured hair without having to use much heat. A little background on my hair: it is relatively thick, it is naturally quite straight, and is very flat. Since I cut my hair shorter, I have paid more attention to adding more volume to my hair, as it is more likely to hold now I have less hair. There is a lot of hype around Charles Worthington products, and I have managed to make my whole routine full of them.

I love volumising shampoos – I have relatively greasy hair, and if I use anything too moisturising at the scalp, it builds up and I’d need to wash my hair again the next day. This shampoo is great for keeping my scalp clean – I usually wash my hair every other day, but with this one I could even leave it to the day after (with the help of dry shampoo, of course). This one is particularly good at creating voluminous styles as it very lightweight. The only downside perhaps is the scent. To me it smells a lot like Calpol… 
The conditioner is also really lightweight, which is also great for not weighing down the hair. I only apply conditioner from the middle to the tips of my hair, and I find this moisturising enough for everyday use. If you have dry hair this may not be enough for you. It has a similar scent to the shampoo.


This has often been deemed as the dupe for the Oribe Dry Texturising Spray. I do agree that it is similar, but this has a much more hairspray-feel to it. To use this, I apply it on dry hair on the underneath sections of the hair near the roots. I find that this gives instant volume much like the Oribe offering, but has much more lasting power. This is probably my favourite product of the range – it gives lots of volume without having to tease or put that much effort in.


I admit, I’m a bit scared of mousse. Ever since the days that I used to use it to create those infamous crunchy wet-looking curls that everyone rocked in the Noughties, I have been quite put off the idea of it. However, I use this in the roots and through the lengths of the hair, brush through and then blow dry, and it creates great results. I find that mousse is the best product to use for true volume, and I find that the volume does last for a few days (with the help of the texturising spray of course). This product has made me want to try more volumising mousses – I am very interested in the Oribe mousse…

I thought it was mandatory to include an awkward selfie so I could show off my hair after having used all these products. Above is first day hair, where I blow dry it upside down until it is roughly 70% dry and leave the rest to dry naturally. I like that these products give my hair an effortless look, but still is nicely voluminous (at least compared to my incredibly flat hair anyway). I definitely recommend these products if you are on a budget and are looking to add some volume to your hair – I personally would much rather spend my money on makeup rather than haircare… 

RachelElizabeth